

In the Alarm rules module, an administrator can configure rules for an alarm. The alarms are triggered when specified events occur based on the alarm rules configured. This helps assess driver behavior and monitor the vehicle status.

Based on the alarm rules configuration, a dispatcher can add an alarm to a specific site to monitor the activities of drivers. The dispatcher receives a notification when an alarm in a geozone is triggered.
Add Alarm Rule #
You can add alarm rules on the SCALAR platform and assign assets. Alarms are triggered based on the alarm rules configured for different events, such as fuel drop, harsh braking, and driving without a tacho card.
This functionality is subject to user permissions. Only an administrator can access the Admin module.
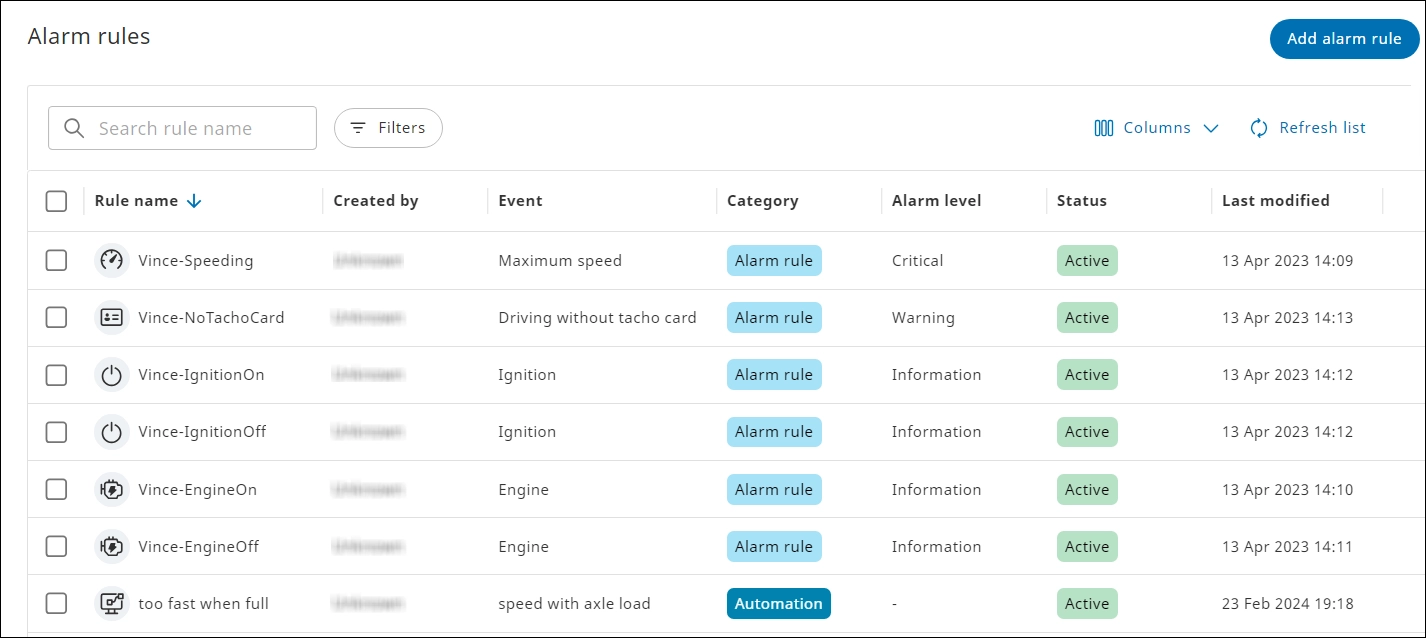
- In the Admin module > click Alarm rules
 . The Alarm rules page is displayed.
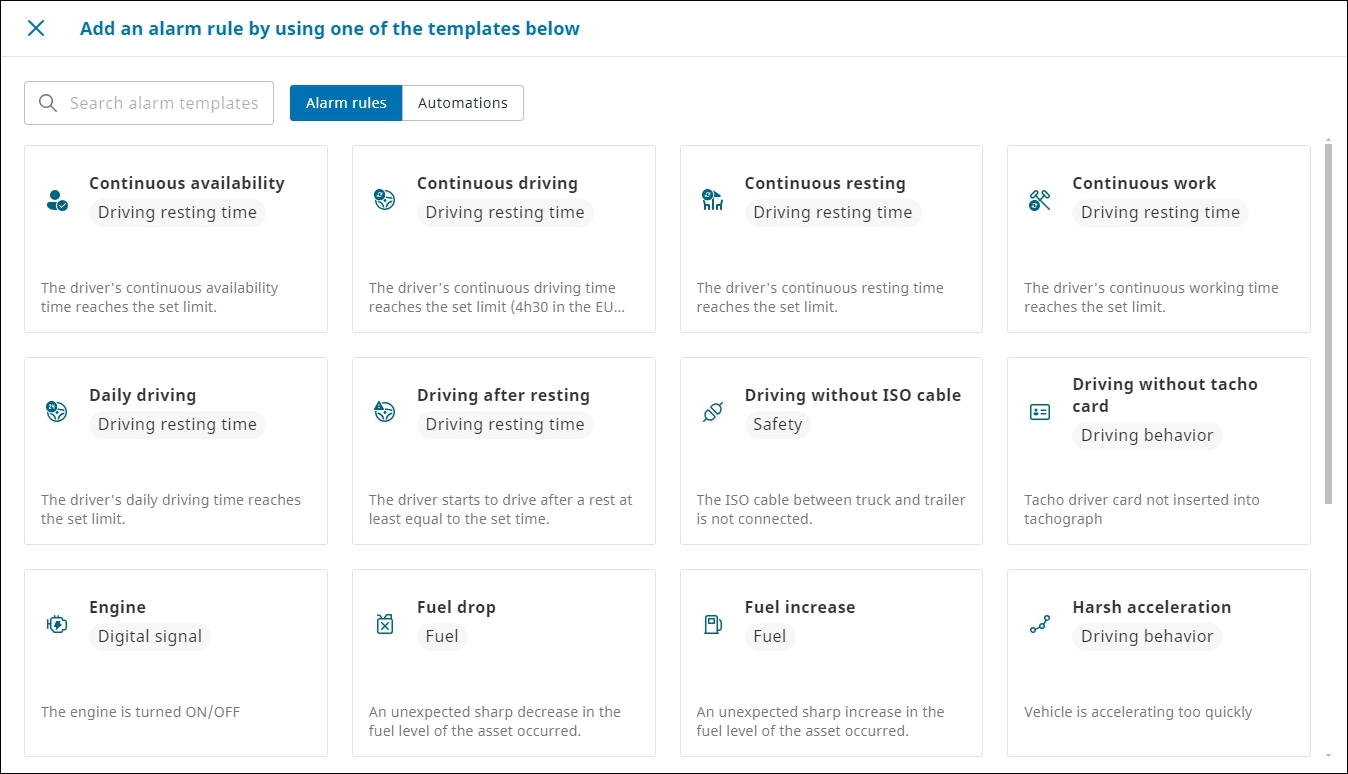
- Click Add alarm rule. The Add an alarm rule by using one of the templates below dialog containing the following tabs is displayed: Alarm rules and Automations.
For more information, see Configuring fixed alarm rules and Configuring organization-specific alarm rules.
Configure fixed alarm rules #
Alarm rules are standardized templates provided to the customer organizations by default where the user can specify the alarm level, enter the threshold value to trigger an alarm, and assign assets.
- From the Add an alarm rule by using one of the templates below dialog > go to the Alarm rules tab.
- From the templates provided, select the option corresponding to the required event. The Add alarm rule page is displayed.

 NOTE:
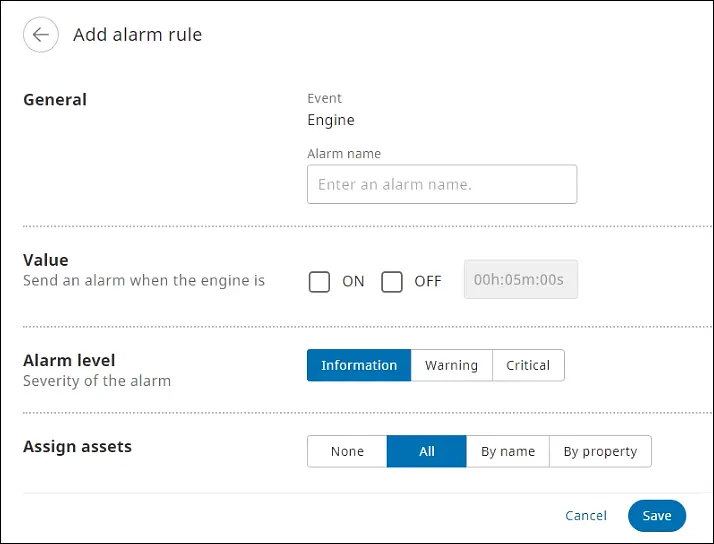
NOTE:In this example, the event selected is ‘Engine’, which is auto-filled.
- In the General section, in the Alarm name box, enter a name for the alarm rule.
- In the Value section, specify the value for the alarm rule to be triggered (the alarm is triggered when it breaches—exceeds or falls beyond the threshold limit). For more information, see Specify Values for Sending Alarms.
NOTE:
The Value field is not applicable for the following events: Driving without ISO cable, Driving without tacho card, and RSS (Roll Stability Support) activation.
- To indicate the alarm severity, in the Alarm level section, select the required tab: Information, Warning, or Critical.
- In the Assign assets section, select the required tab: None, All, By name, or By Property, and then click Save. The alarm rule is saved. For more information on how to assign assets and teams for alarm rule application, see Assign Assets to an Alarm by name and Assign Assets to an Alarm by Property.
Specify Values for Sending Alarms #
| Event | Value | Description |
| Continuous availability | Enter the required duration in hours and minutes to specify the maximum time that a driver can be continuously available. If it exceeds this duration, an alarm will be triggered. | The driver’s continuous available time exceeds the allowed limit. |
| Continuous driving | Enter the required duration in hours and minutes to specify the maximum time that a driver can drive continuously. If it exceeds this duration, an alarm will be triggered. | The driver’s continuous driving time exceeds the allowed limit. |
| Continuous resting | Enter the required duration in hours and minutes to specify the maximum time that a driver can rest continuously. If it exceeds this duration, an alarm will be triggered. | The driver’s continuous resting time exceeds the allowed limit. |
| Continuous work | Enter the required duration in hours and minutes to specify the maximum time that a driver can work continuously. If it exceeds this duration, an alarm will be triggered. | The driver’s continuous work duration exceeds the allowed limit. |
| Daily driving | Enter the value in hours and minutes to specify the maximum duration for driving on any given day that when exceeded, triggers an alarm. | The driver’s daily driving duration exceeds the allowed limit. |
| Driving after resting | Enter the required rest duration in hours and minutes that the driver must take before resuming driving. If the driver resumes driving before completing the set rest period, an alarm will be triggered. | The driver resumes driving before the rest period has ended. |
| Driving without ISO cable | The value field is not applicable for this event. | The ISO cable is not connected (truck-trailer connection). NOTE: Always ensure the ISO cable is properly connected before towing a trailer. Driving a vehicle that is towing a trailer without the ISO cable is not recommended and can be dangerous. The ISO cable connects the electrical systems of the trailer and the towing vehicle, ensuring the trailer’s lights, indicators, ABS and other intelligent braking and electrical systems function properly. |
| Driving without tacho card | The value field is not applicable for this event. | The tacho driver card is not inserted into the tachograph device. NOTE: Drivers must insert the tacho card before starting a trip for the driver and vehicle activities to be recorded. |
| Engine | Select the On or Off checkbox to specify whether an alarm is to be triggered when the engine is turned on or off. Set the time to trigger the alarm, for example, ‘00h:05m:00s’. | Vehicle engine is turned on or off. |
| Fuel drop | Enter the percentage decrease in fuel of an asset that when reached, triggers an alarm, for example, 20%. | An unexpected sharp decrease in fuel level of an asset. |
| Fuel increase | Enter the percentage increase in fuel of an asset that when reached, triggers an alarm, for example, 20%. | An unexpected sharp increase in fuel level of an asset. |
| Harsh acceleration | Enter the value to specify the acceleration rate that when reached, triggers an alarm, for example, 4.5 m/s². | Driver accelerating speed of the vehicle rapidly. |
| Harsh braking | Enter the value to specify the deceleration rate that when reached, triggers an alarm, for example, 3 m/s². | Speed of the vehicle decelerates because of sudden braking. |
| Idling | Enter the value to specify when idling time exceeds the threshold limit to trigger an alarm, for example, 00h:05m. | The engine is running while the vehicle is not in motion. |
| Ignition | Select the On or Off checkbox to specify whether an alarm is to be triggered when the ignition is turned on or off Set the time to trigger an alarm, for example, 00h:05m:00s. | Ignition is turned on or off. |
| Maximum RPM (Revolutions per minute) | Enter the value to specify when the RPM exceeds the threshold limit to trigger an alarm, for example, 1700 RPM. | Maximum allowed engine limit for RPM. |
| Maximum speed | Enter the value to specify when the maximum speed in km per hour exceeds the threshold limit to trigger an alarm, for example, 90 km/h. | Maximum speed of the vehicle in kilometer per hour. |
| RSS (Roll Stability Support) activation | The value field is not applicable for this event. | Identified dangerous driving conditions that can lead to vehicle rolling over. |
| Service time (6 hours) | Enter the value to specify the driver’s maximum service time that can be allowed without taking a break exceeding which an alarm will be triggered. | The driver’s maximum service time allowed without taking the required break (30 minutes). |
| Service time (9 hours) | Enter the value to specify the driver’s maximum service time that can be allowed without taking a break exceeding which an alarm will be triggered. | The driver’s maximum service time allowed without taking the required break (45 minutes). |
Assign Assets to an Alarm by name #
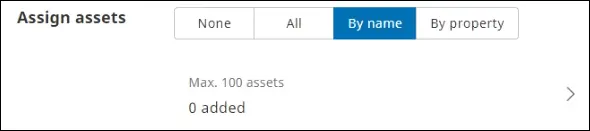
- On the Add alarm rule page, in the Assign assets section, click the By name tab. The section that shows the number of assets assigned is displayed.

- Click Max. 100 assets. The Add assets page is displayed.

- From the <number> assets available pane, click Add
 next to the assets to be assigned. The assets added are listed on the right pane and assigned to the alarm.
 - Click Done. The selected assets are added and you are redirected to the Add alarm rule page.
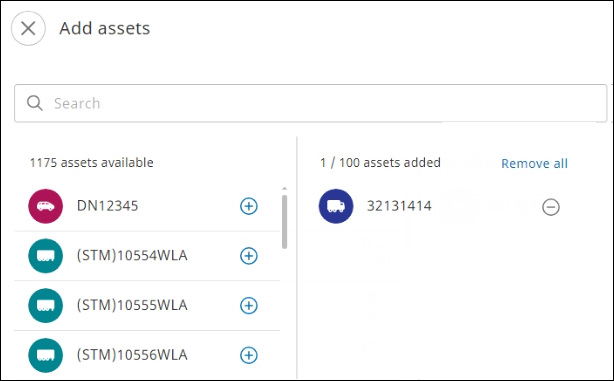
To unassign an asset, from the right pane, click Remove ![]() next to the asset name. To unassign all the assets, click Remove all.
next to the asset name. To unassign all the assets, click Remove all.
Assign Assets to an Alarm by Property #
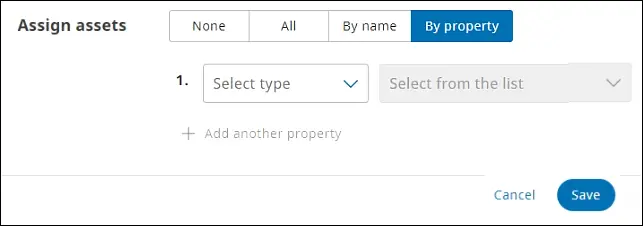
- On the Add alarm rule page, in the Assign assets section, click the By property tab. The section to assign alarm rules based on asset types and teams is displayed.
- Next to the Asset type list, from the Select asset types list, select one or more asset types.
- Click Add another property to assign assets by teams. The Teams list is displayed.
- Next to the Teams list, from the Select teams list, select one or more teams.

- Click Save. The selected assets and teams are assigned.
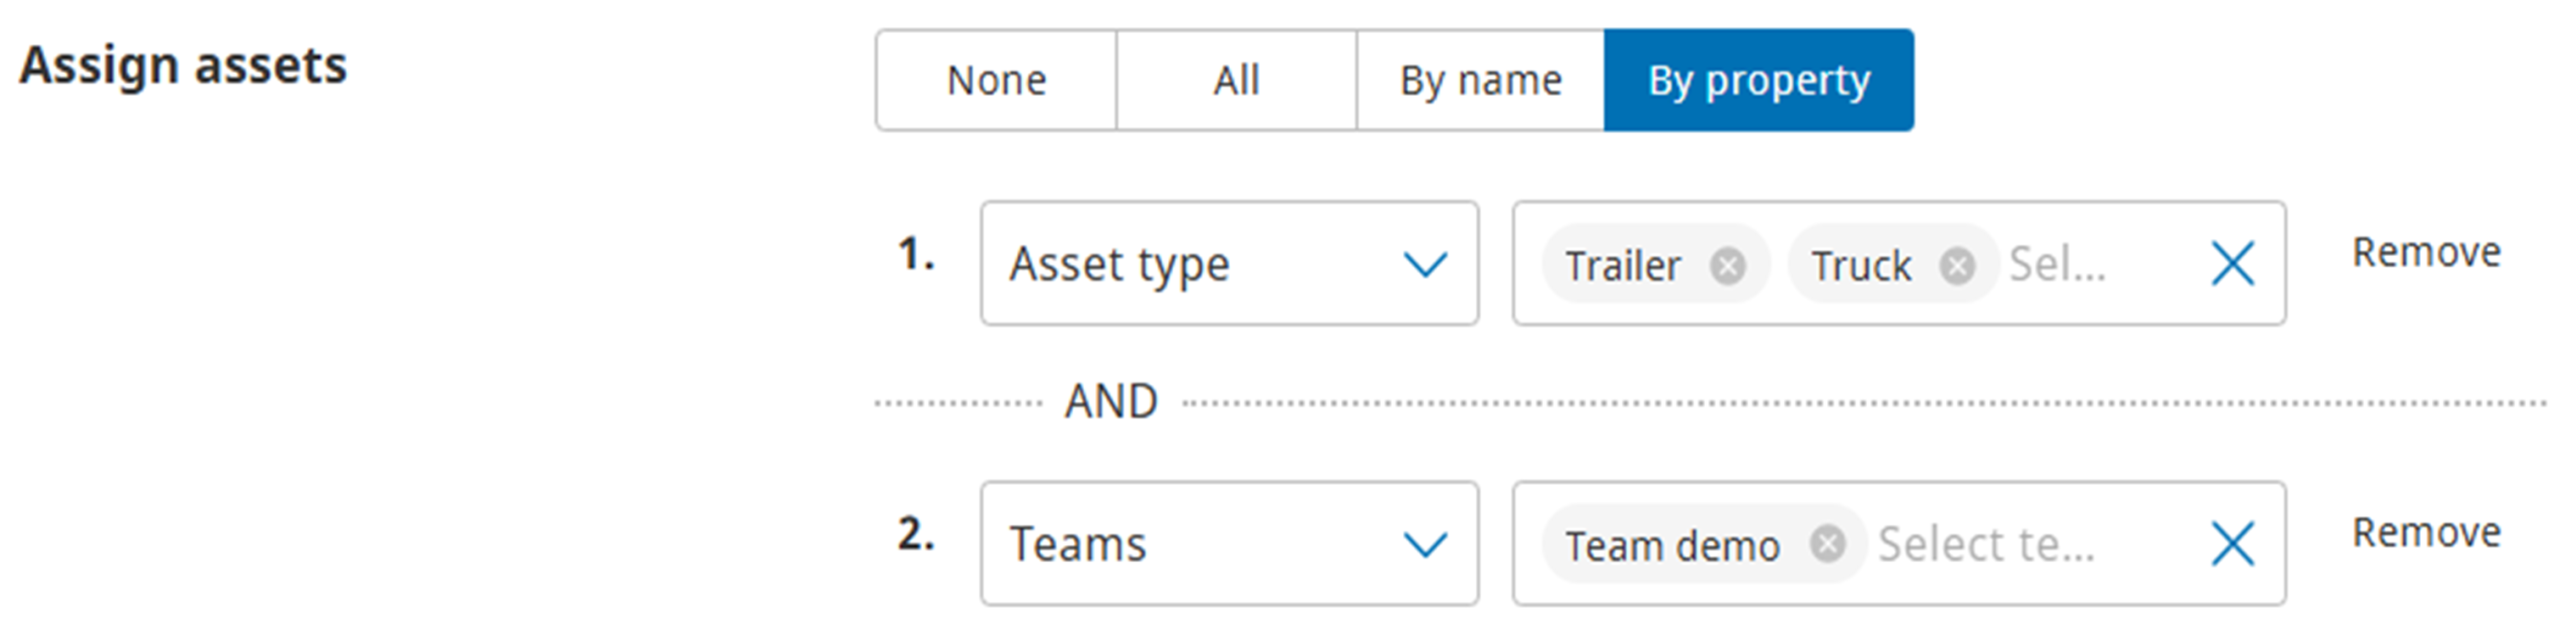
When you combine different properties, BOTH conditions must be met. For example, the asset type must be “Trailer” AND the asset must be part of the selected team.
Configure custom alarm rules (Automations) #
Custom alarms are user-defined alarm rules activated by an organization’s administrator in which the threshold values for conditions, variables, and outputs are specified to trigger an alarm. This section explains how to configure a custom alarm rule using a template on the Automations tab.
- Based on an organization’s requirements, the ZF internal team can create and publish alarm custom rule definitions, which are made available as templates in the Automations tab.
- For specific trailer devices (SCALAR EVO Pulse, SCALAR EVO Guard, and third-party devices), several custom trailer alarms are available (cf. Available alarm types).
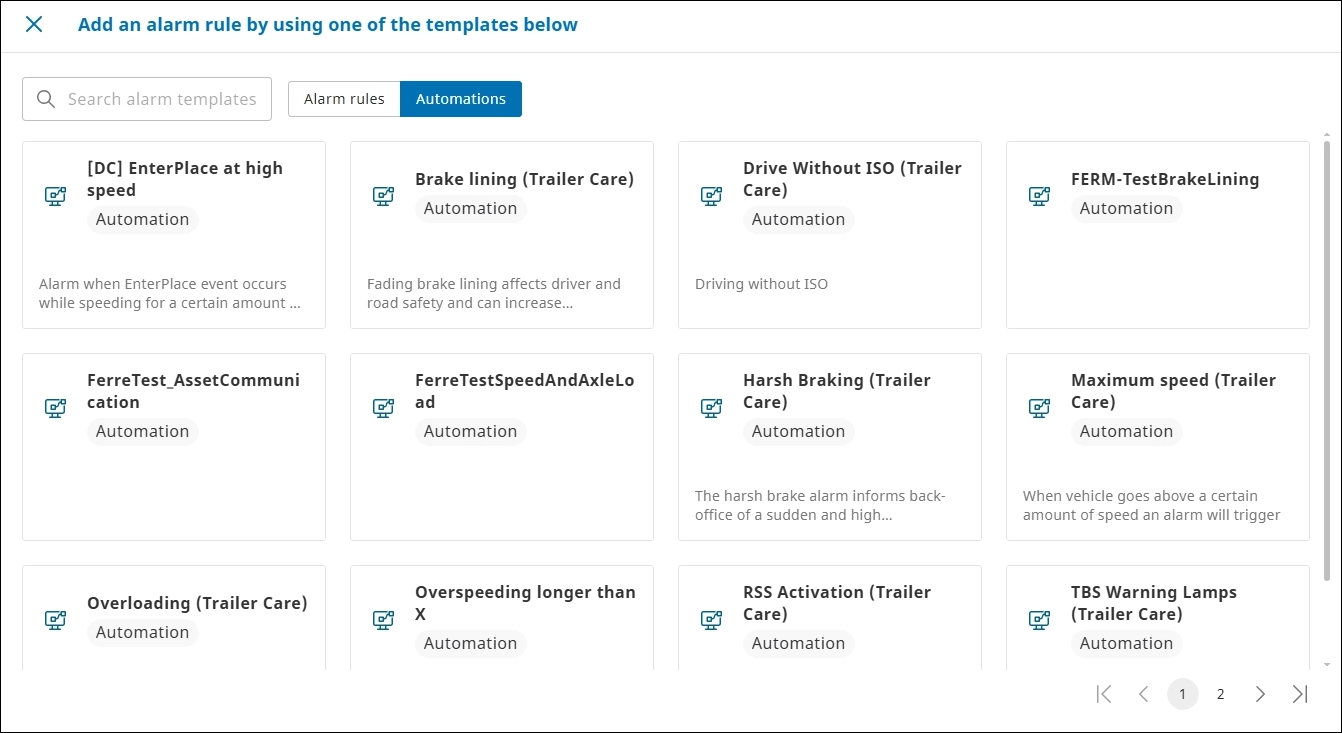
- From the Add an alarm rule by using one of the templates below dialog > go to the Automations tab. The templates available for configuring user-defined alarm rules are displayed as cards.

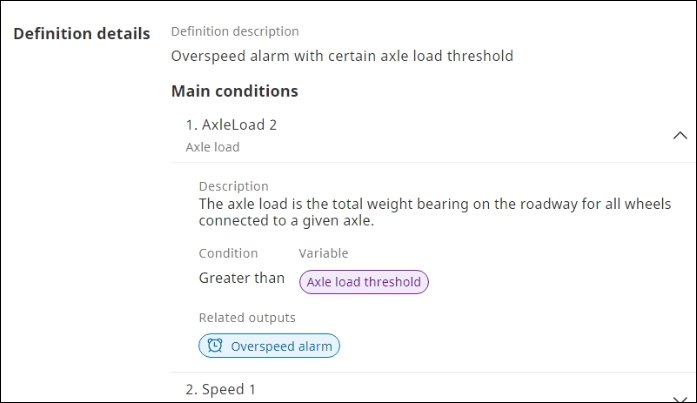
- Select the card corresponding to the required event: in this example, we use a custom alarm related to overspeeding and axle load “DC Overspeed with Axle”. The Automation setup page is displayed.

- In the General section, in the Automation name box, enter a name for the automation rule.
- In the Definition details section, specify the main conditions, variables, and output.
- ABS activation (only available on SCALAR EVO Pulse)
- Asset communication
- Axle load
- Battery level
- Brake lining insufficient
- Braking system status
- Driving without ISO cable
- Enter place
- Fuel decrease
- Fuel increase
- Harsh acceleration
- Harsh brake
- Ignition On/Off
- Leave place
- LIN contact
- LIN temperature
- Logger digital input
- Logger temperature
- Max RPM
- Max speed
- Reefer temperature
- RSS
- Speed
- Tire pressure
- Tire pressure status
- Tire temperature
- In the Main conditions section, click next to Axle load to expand the section.

- Click Axle load threshold to go to the Variables section.
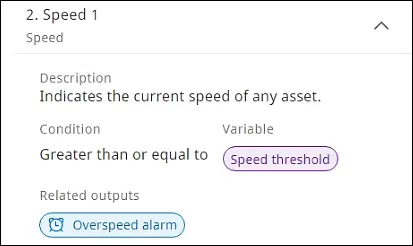
- Click next to Speed to expand the section.

- Click Speed threshold to go to the Variables section.

Click Show preview to view the configured alarm definition.
Available alarm types:
The anti-lock braking system (ABS) helps prevent wheel lockup during sudden, harsh, or forceful braking, improves stopping distance, and maintains steering control during emergencies. Frequent ABS activation events may indicate that the trailer is being operated without sufficient caution. Insight into ABS activation data enables the fleet manager to coach drivers on safe driving practices and adherence to safety protocols.
Main conditions
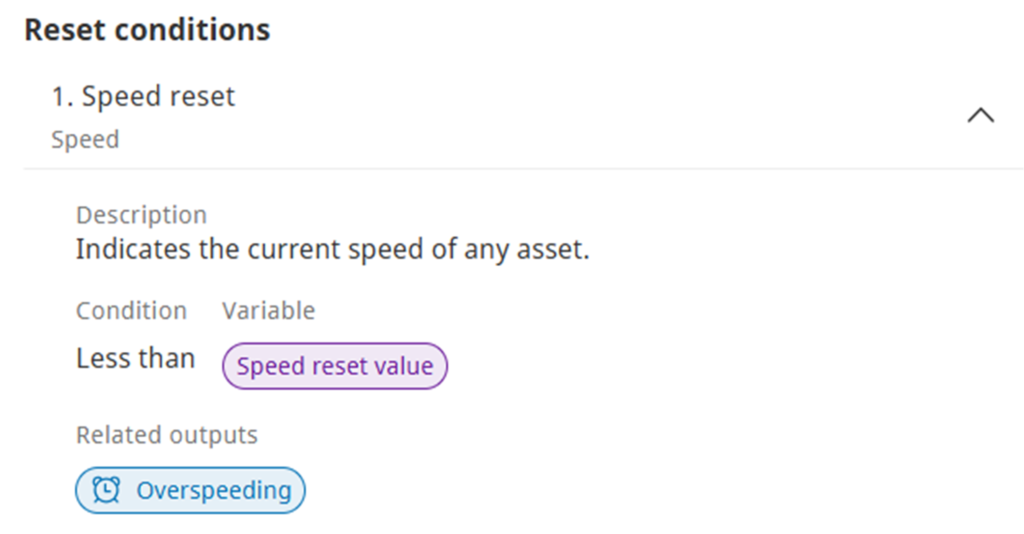
Reset conditions
Some alarm rules may also contain a reset condition (configured in the alarm definition by the ZF internal team). In that case, after triggering an alarm, the assessed value must first drop below a configured limit (= reset value) before a new alarm can be triggered.
Example: For an overspeeding alarm at 130 km/h, a variable (= speed reset value) can be set to 100 km/h. In that case, when an alarm is triggered the first time, speed must first drop below 100 km/h before a new alarm is triggered.
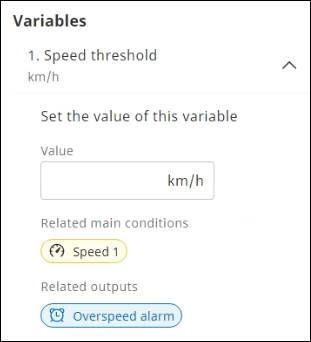
Variables
- Click
 to expand the section, and set the value for the speed threshold. The alarm is triggered when it breaches—exceeds or falls beyond the threshold limit

- Click to expand the section, and set the value for the axle load threshold. The alarm is triggered when it breaches—exceeds or falls beyond the threshold limit


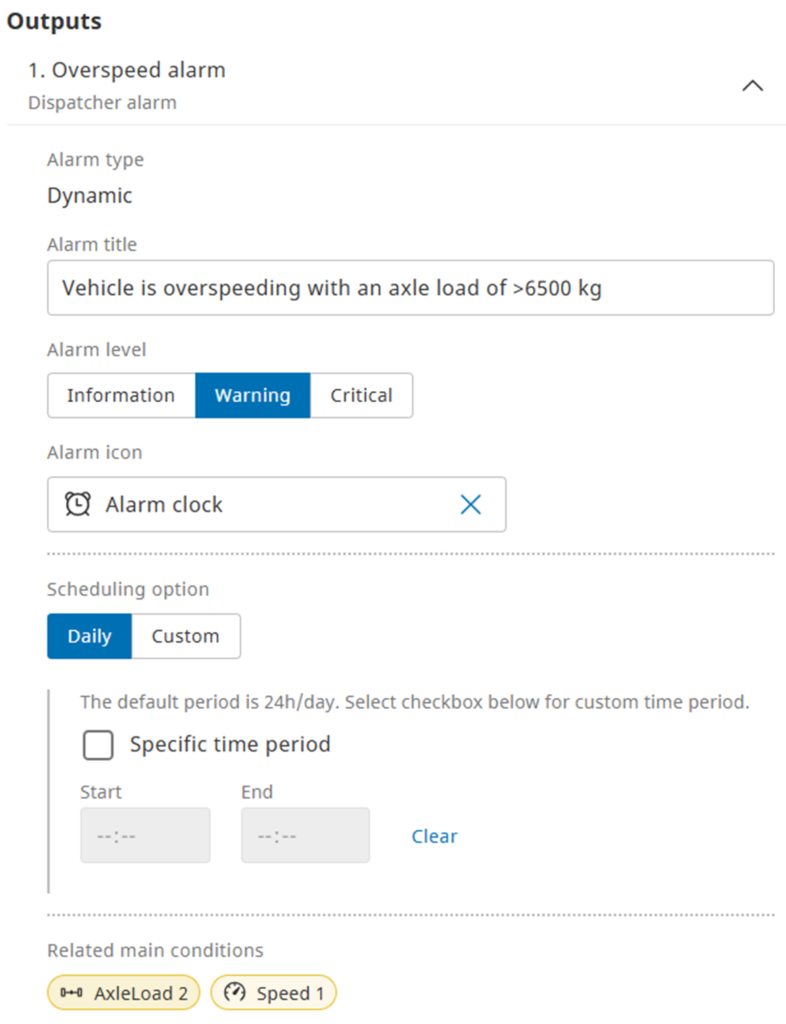
Outputs
Click ![]() to expand the output section and enter the following alarm details.
to expand the output section and enter the following alarm details.
- Alarm title
- Alarm level
- Alarm icon
- Scheduling option (For more information, see Configure Settings for Scheduled Alarms).
5. In the Assign assets section, assign assets for which this automation rule will be applied. For more information, see Assign Assets to an Alarm by name and Assign Assets to an Alarm by Property.
Not all alarm types are supported by all unit types. The following alarm types are not supported on TX-GO and SCALAR EVO Guard:
- Alarm rule with Enter place / Leave place input
- Alarm rule with asset communication input
- Alarm rule with more than one output
- Alarm rule with either tire pressure, tire pressure status or tire temperature input with timer
- Alarm rule with reset option configured with reset timer
6. Click Activate. The alarm rule based on the automation workflow defined is activated.
This is a representative image of a user-defined alarm triggered on the Alarms pane of the Track and Trace module when a threshold value is breached. 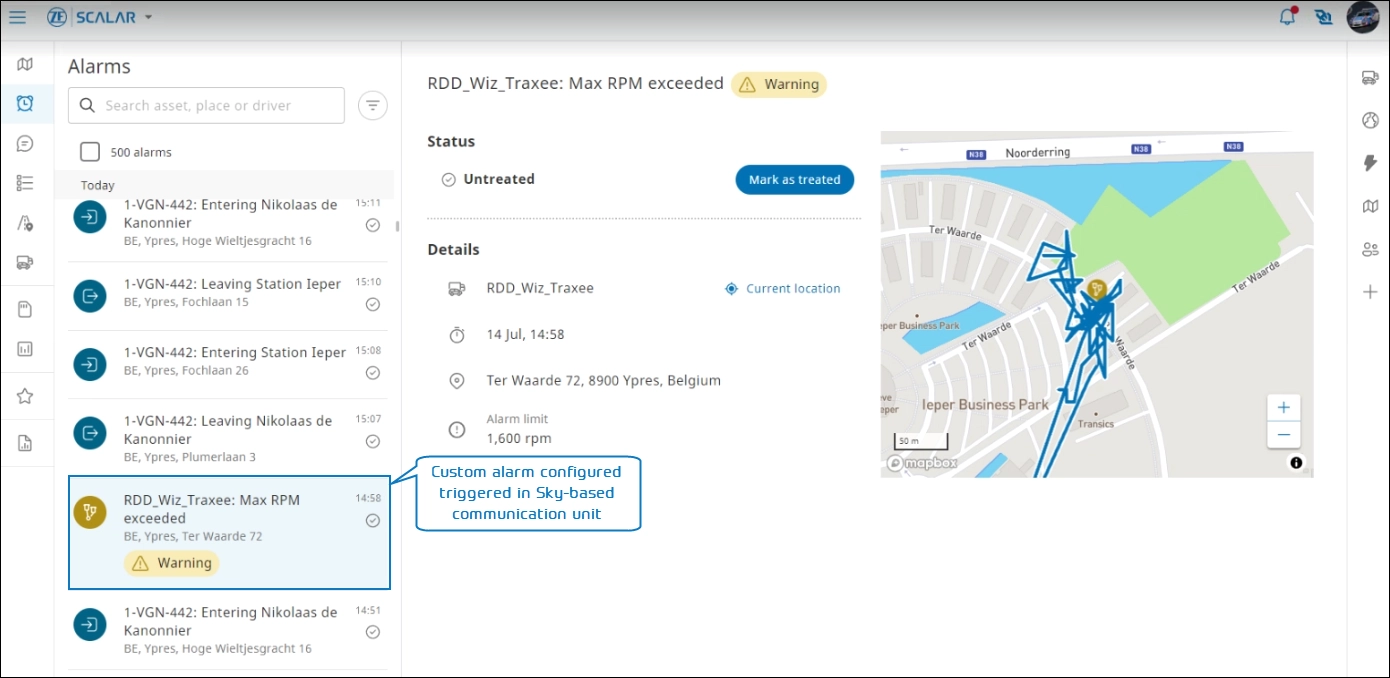
Configure Settings for Scheduled Alarms
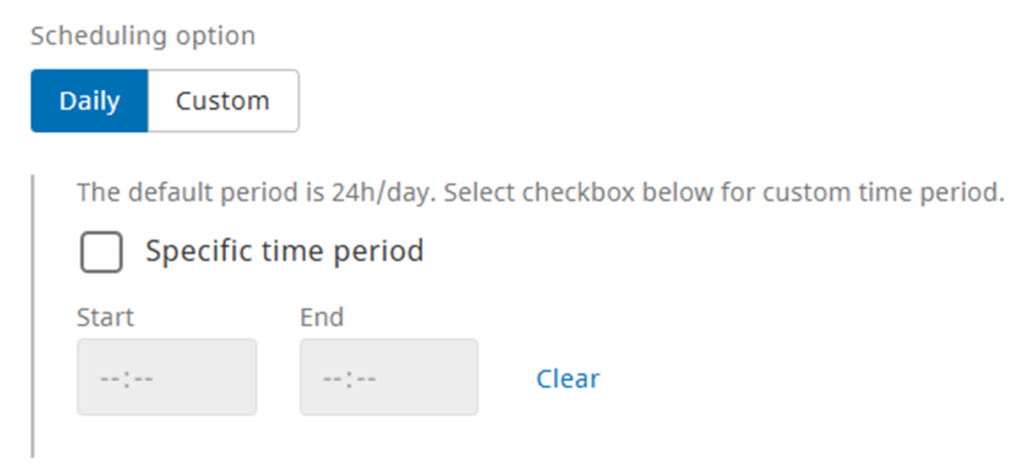
You can configure settings for scheduled alarms that are triggered daily or on selected days.
Daily: To configure the specific period during which the alarm must be triggered, in the Scheduling option section, select Daily, and then select the Specific time period checkbox. The Start and End fields will be enabled. Enter the start and end time. The alarm will be triggered daily during the specified time period. Click Clear to reset.
Custom: To configure a custom period during which the alarm must be triggered on individual days, in the Scheduling option section, select Custom, and then click Add schedule.
Next, configure a custom alarm schedule by selecting the required day(s), and start and end time(s) for the alarm to be triggered. The alarm will be triggered during the specified period for the selected days.
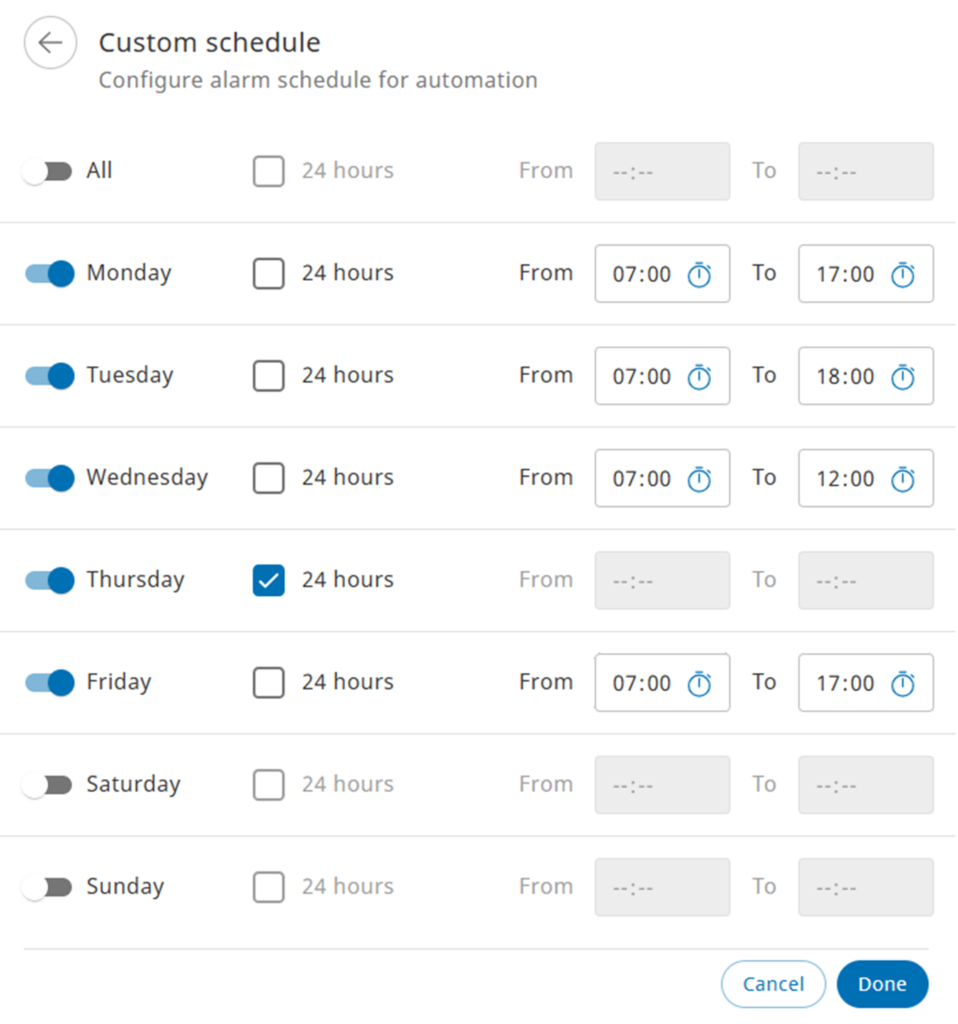
Click Done to save the schedule. The schedule is saved and you are redirected to the Automation setup page.
NOTE: If the “24 hours” checkbox is selected, the Start and End times will be disabled.
Edit Alarm Rule #
- To edit an alarm rule record, on the Alarm rules page, select the required alarm rule from the list. The alarm rule information page is displayed.
- Modify information in the required sections:
For fixed alarms: General, Value, Alarm level, and Assign assets. For more information, see Add Alarm Rule.
For alarms configured by using automation rules: Conditions, Variables, Outputs, and Assign assets. - Click Save. The modified information is saved.
View Alarm Rules List #
In the Admin module > click Alarm rules ![]() . The Alarm rules window is displayed.
. The Alarm rules window is displayed.
Click Sort ![]()
![]() in the column headers to sort records in ascending or descending order.
in the column headers to sort records in ascending or descending order.
Available fields
| Column name | Description |
| Rule name | Name of the alarm rule |
| Created by | User that created the alarm rule. |
| Event | Specifies the event in which the alarm will be triggered, for example, harsh braking, fuel drop, and driving without tacho card |
| Category | Alarm type, such as Alarm rule and Automation. |
| Alarm level | Alarm severity level: Information, Warning, or Critical that denotes the following: Information: Activity of an asset, such as entering or leaving a siteWarning: Driving behavior of the driver, such as harsh acceleration and harsh breakCritical: Safety-related information about the driver or asset. |
| Status | Active / Inactive / Unavailable. Active: Activate an alarm rule by assigning one or more assets. Inactive: Deactivate an alarm rule by unassigning all assets (cf. Assign assets: None). Unavailable: An alarm rule is set to unavailable when the alarm definition was removed by the ZF internal team. |
| Last modified | Date and time stamp when the alarm rule was last modified. |
Filter Alarm Rules #
You can filter alarm rules to narrow search results based on the alarm level, category, and status on the Alarm rules page by using the Filters option.
- To open the filter pane, on the Alarm rules page > click Filters
 . The Filter pane is displayed.
- In the Alarm level, Category, and Status sections, select the required options. The alarm rule records that fulfil the criteria are listed.

- To clear the applied filters, in the Filters pane, click the Reset all link.
- The numeric value displayed on the Filters button is a counter that indicates the number of filter criteria selected. For example, in this example, two filter criteria are applied
 .
.
Search an Alarm Rule #
You can search an alarm rule on the Alarm rules page by using the Search feature.
In the Search box, enter the alarm rule name. The records matching the search criteria are listed.
Enter at least three characters to start a search operation.
Remove an Alarm Rule #
You can remove an alarm rule if it is no longer required.
- In the Admin module > click Alarm rules . The Alarm rules page is displayed.
- Click the required alarm rule record. The alarm rule information page is displayed.
- Click the Remove link. The Remove alarm rule dialog is displayed.
- Click Remove. The alarm rule is permanently removed from the SCALAR platform.


