An asset is any type of vehicle such as trucks, vans, trailers, car, bus, and mini-bus that is tracked and monitored by transport companies (dispatchers) to ensure smooth and efficient cargo delivery and on-demand people mobility. Assets can be managed from the Assets page.
Asset groups #
Related assets can be organized into asset groups, which can be followed by the assigned users and teams from the Map view.
An administrator can create and edit groups and subgroups, search for assets, and assign and unassign assets and teams to a group.
Add an Asset #
Transport companies (dispatchers) can track and monitor an asset in the Map view after adding it to the SCALAR platform.
This functionality is subject to user permissions. Only an administrator can access the Admin module.
- In the Admin module > click Assets
 . The Assets page is displayed.
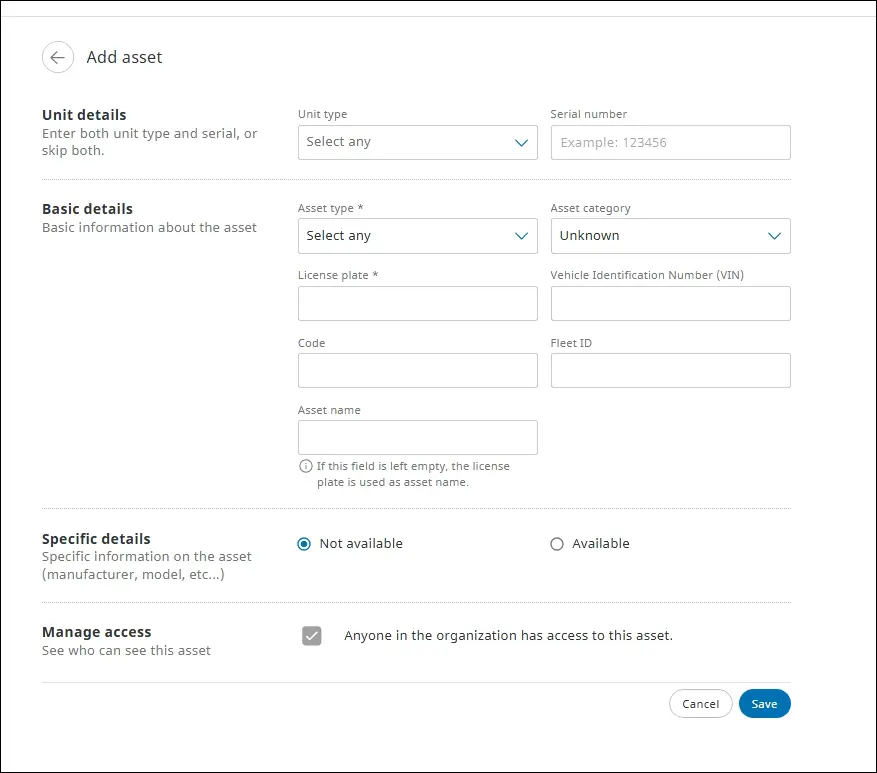
- Click Add asset. The Add asset page is displayed.

- Enter all asset details as explained in the table below, and then click Save.

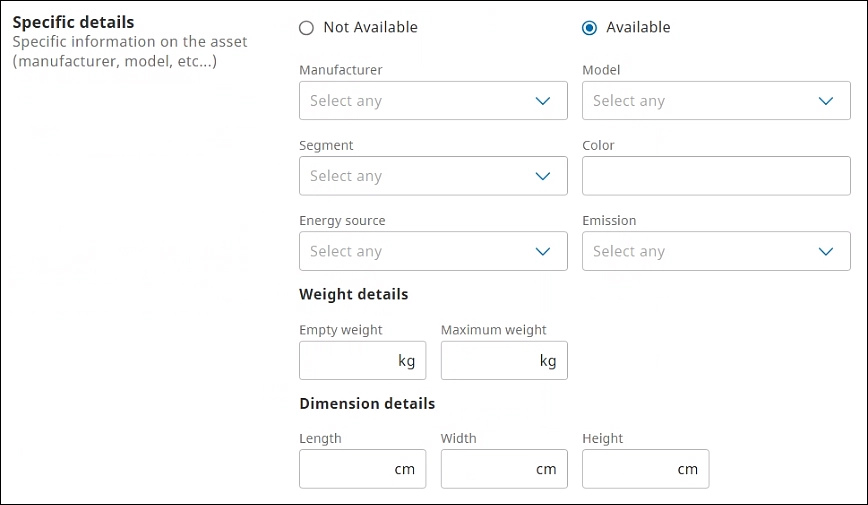
If specific details are available, select the Available option. The additional fields to enter asset information are displayed.
| Section | Field | Action |
| Unit details | Unit type | From the list, select the unit installed on the asset. NOTE: The unit type can be paired or unpaired to an asset but it cannot be edited after saving the asset. |
| Serial number | Enter the unique serial number of the unit, which can be found on the device label. | |
| Basic details | Asset type* | Select the asset type such as truck, van, car, minibus, trailer, and bus. NOTE: Available asset types depend on the selected unit type. |
| Asset category | Select the asset category, such as food transport, general cargo, and silo transport. NOTE: The asset category “Passenger transport” will only be available when selecting asset type “Car”, “Bus” or “Minibus”. Selecting “Passenger transport” as the asset category will also enable additional input fields, such as Seating capacity and Weelchair slots. | |
| License plate* | Enter the unique vehicle registration number. | |
| Vehicle Identification Number (VIN)* | Enter the VIN for the vehicle. NOTE: The VIN must be unique. VIN is mandatory for assets that are supported by tachograph. | |
| Code | Enter the unique asset identification number. | |
| Fleet ID | Enter the unique identification number for the company’s group of vehicles. | |
| Asset name | Enter the name of the asset NOTE: If this field is not filled in, the license plate is used as asset name. | Seating capacity* | Number of seats in the vehicle, not including the driver seat. NOTE: This mandatory input field is only available when selecting the asset category “Passenger transport”. |
| Wheelchair slots | Number of wheelchair slots in the vehicle. NOTE: This optional input field is only available when selecting the asset category “Passenger transport”. | |
| Tachograph details | Digital Tacho Version* | Select the digital tacho version. NOTE: This input field is mandatory, except when selecting the asset category “Passenger transport”. In that case, the digital tacho version is optional and, when you select a digital tacho version, the Vehicle Identification Number (VIN) must also be entered. |
| Tachograph is RDD enabled | Select the checkbox to specify whether the Remote Data Download (RDD) is enabled on the tachograph and the DDD (Digital Data Distiller) files can be downloaded from the tachograph. NOTE: This option is activated only after the Digital Tacho version is selected (old or new protocol). The VIN must be entered to enable RDD. | |
| RDD is active during contact off | Select the RDD is active during contact off checkbox so that the RDD is enabled even if the ignition key is switched off. | |
| Tacho company name | Select the company name for which the tacho card is registered. Tacho company cards can be added in Admin > Tachograph > Tacho company card. | |
| Specific details (optional) | Asset information availability | To provide asset information, select Available or Not Available as the case may be. NOTE: After selecting Available, the section to enter specific asset information is displayed. |
| Manufacturer | From the list, select the automotive manufacturer. | |
| Model | From the list, select the model. | |
| Segment | From the list, select the segment under which this vehicle can be classified. | |
| Trailer type | From the list, select the trailer type, such as passenger chassis, dry van, and reefer . NOTE: Applicable for asset type “Trailer”. | |
| Color | Enter the vehicle color. | |
| Energy source | From the list, select the source of power or energy supply, for example, hydrogen, LPG, electric, and hybrid. | |
| Emission | From the list, select the standard governing and regulating emission norms. For example, in the case of electric vehicles, Euro 6 or Euro 7 can be chosen based on the country. | |
| Weight details | ||
| Empty weight | Specify the weight of the vehicle without cargo, passengers, or driver and expressed in kilograms. | |
| Maximum weight | Specify the maximum weight that a vehicle can support that includes its own weight, cargo, passengers, and any equipment and expressed in kilograms. NOTE: Maximum weight must be more than empty weight. | |
| Dimension details | ||
| Length, Width, and Height | Specify the vehicle dimensions in centimeters. | |
| Manage access | By default, the Anyone in the organization has access to this asset checkbox is selected. To restrict permission to specific users or asset groups or integrators to track and monitor this asset, you can edit the asset access permission. | |
- The fields that are marked with * are mandatory
- Max. 5000 resources can be assigned to any resource group or subgroup. A user can follow a maximum of 25 teams x 100 groups x 5000 of each resource type (assets, places, drivers).
- Max. 2000 resource groups (including subgroups) of each group type (asset,
place, and driver groups) can be created in an organization. - Asset type, namely car, bus, and minibus constitutes passenger transport, while truck, van, and trailer are applicable to cargo transport. Select the asset category accordingly.

- Entering the seating capacity is mandatory when selecting asset category ‘Passenger transport’.
- If a tachograph is connected and the information is selected in the Tachograph details section, the VIN (Vehicle Identification Number) is mandatory.
- The Tachograph details section may be hidden based on the selected asset type or category availability. For example, this option will be unavailable for asset type ‘Trailer’ and for asset type ‘Car’ in combination with asset category ‘Passenger transport’.
- In the Specific details section, while selecting a manufacturer, segment, or model, the values are restricted based on the asset settings configured. For example, only models configured while adding a manufacturer (in this example, it is Tata) are listed.


The asset will now be displayed in the Assets list.
Edit an Asset #
- To edit an asset record, on the Assets page, select the required asset. The asset details page is displayed.
- Modify the asset information in the following sections:
- Paired communication unit
- Asset details: Edit asset details, such as asset type, license plate number, and asset category.
- Status: You can change the asset status to mark it as Active or Inactive.
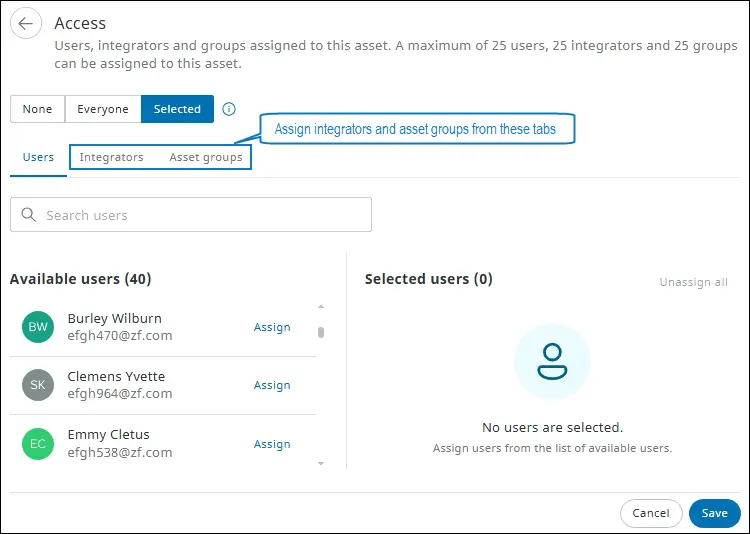
- Access: You can assign users, integrators, and asset groups to this asset. You can specify whether the asset can be monitored by all users (default option) or assign the asset to specified users, integrators, or groups.
Click Access. The Access page is displayed.- To restrict access for an asset to any user and integrator, click None.
- To assign access for an asset to all users and integrators, click Everyone.
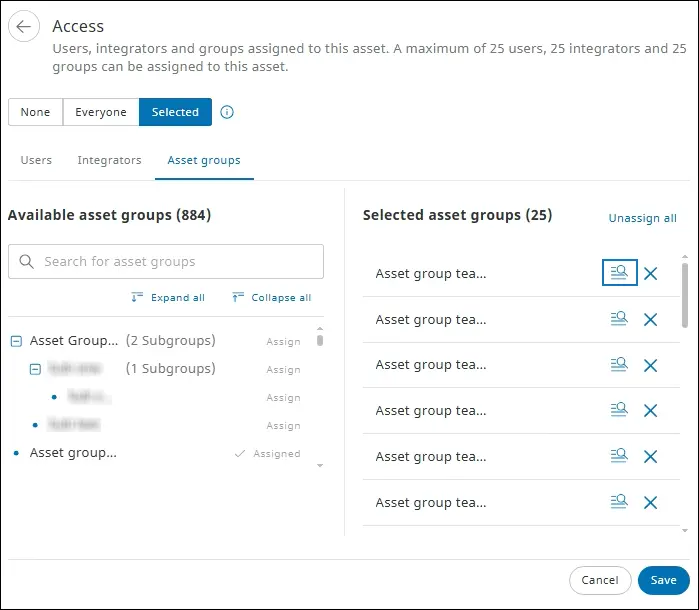
- To assign selected users, integrators, or asset groups to an asset, click Selected. The Available users are listed on the Users tab.

The table below describes the actions that can be performed within the resource-specific tab.
Tabs Action Users 1. Click the Users tab. The users are listed in the Available users list.
2. To assign a user to an asset, select the required users from the Available users list. Alternatively, in the Search users box, enter the name of the required user, and then press Enter.
3. Click Assign next to the user name. The user is listed in the Selected users list.
4. Click Save. The user is assigned to the asset.
Note:
In the Selected users section, click Unassign next to the user name. The user is unassigned. Click Save to permanently unassign the user from the asset.
Click Unassign all to unassign all users from the asset.Integrators 1. Click the Integrators tab. The integrators are listed in the Available integrators list.
2. To assign an integrator to an asset, select the required integrators from the Available integrators list. Alternatively, in the Search integrators box, enter the name of the required integrator, and then press Enter.
3. Click Assign next to the integrator name. The integrator is listed in the Selected integrators list.
4. Click Save. The integrator is assigned to the asset.
Note:
In the Selected integrators section, click Unassign next to the integrator name. The integrator is unassigned. Click Save to permanently unassign the integrator from the asset.
Click Unassign all to unassign all the integrators from the asset.Asset groups 1. Click the Asset groups tab. The asset groups are listed in the Available asset groups list.
2. To assign an asset to an asset group, select the required asset group from the Available asset groups list. Alternatively, in the Search for asset groups box, enter the name of the required asset group, and then press Enter.
3. Click Assign next to the asset group name. The asset group is listed in the Selected asset groups list.
4. Click Save. The asset is assigned to the asset group.
Note:
In the Selected asset groups section, click the Unassign icon next to the asset group name. The asset group is unassigned. Click Save to permanently unassign the asset from the asset group.
To trace the hierarchy from where the asset group or an asset subgroup is assigned, in the Selected asset groups section, click the Locate icon next to the asset group name. The asset group or subgroup is highlighted in the Available asset groups list.Teams for integrators
Assets can be leased to multiple clients, which introduces the potential risk of exposing sensitive information to unauthorized users while sharing data across these clients. The Teams for integrators feature provides a granular level of data access, ensuring that integrators can only access information related to asset groups assigned to their respective teams. This approach maintains confidentiality and prevents inadvertent data breaches. By restricting integrators to accessing only data relevant to their assigned groups, this feature ensures data privacy and strengthens security.
NOTE:The unit type can be paired or unpaired with an asset type but it cannot be edited.
NOTE:Assets marked as Inactive are not displayed in the Map view.
- Click Save. The modified information is saved.
 icon next to the asset group name. The asset group is unassigned. Click Save to permanently unassign the asset from the asset group.
 icon next to the asset group name. The asset group or subgroup is highlighted in the Available asset groups list.
Unassign the Asset from the Asset groups #
If a dispatcher is not required to monitor the activities of the assets in an assigned site anymore, you can remove the access permission.
- In the Access page, click Selected, and then click the Asset groups tab. In the Selected asset groups section, click the Unassign icon next to the asset group name. The asset group is unassigned. Click Save to permanently unassign the asset from the asset group.
It can take up to five minutes for the change to be reflected in the application.
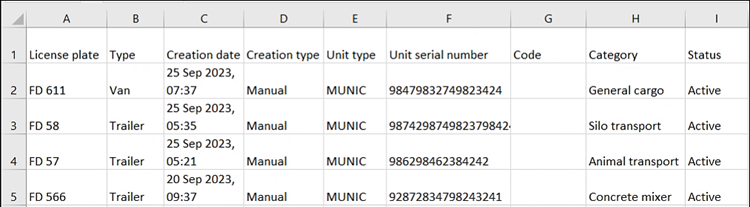
View Assets #
In the Admin module > click Assets ![]() . The Assets page is displayed.
. The Assets page is displayed.
Click ![]()
![]() in the column headers to sort records in ascending or descending order.
in the column headers to sort records in ascending or descending order.
Available fields
| Column name | Description |
| Fleet ID | Unique identification number assigned to a fleet |
| License plate | Unique vehicle registration number |
| Asset name | Unique identifier or label assigned to a vehicle ‘ NOTE: If the asset name is not entered, the license plate number serves as the asset name. |
| Type | Vehicle type, such as car, van, trailer, and truck |
| Creation date | Date of asset registration |
| Creation type | Creation mode: Manual or Automated (through API) |
| Paired unit | Serial number of the paired unit NOTE: If a unit is not connected to an asset, ”Not paired” is displayed. |
| Unit type | Tracking unit that is set up and integrated with the asset, such as TX-GO, DAF, and MUNIC |
| Unit serial number | Unique unit identification number |
| Code | Unique asset identification number |
| Category | Asset category, such as food transport, general cargo, and silo transport |
| Status | Active or Inactive |
| Access | An asset can be accessed by: Everyone, or n Users, n Integrators, and n Groups, for example, 25 users, 25 Integrators, 25 Groups |
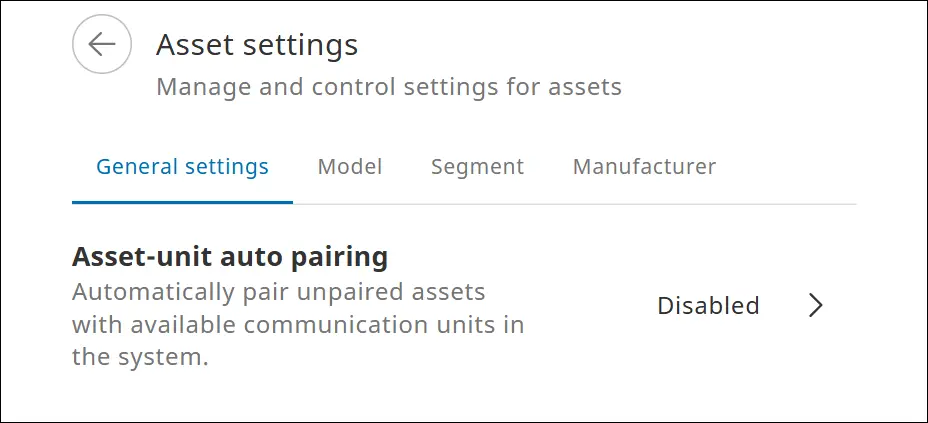
Asset settings #
On the Asset settings page, you can enable or disable the automatic pairing feature for unpaired assets with available communication units in the organization. You can also manage asset settings, specific to model, segment, and manufacturers on the Asset settings page.
Enable asset and unit automatic pairing #
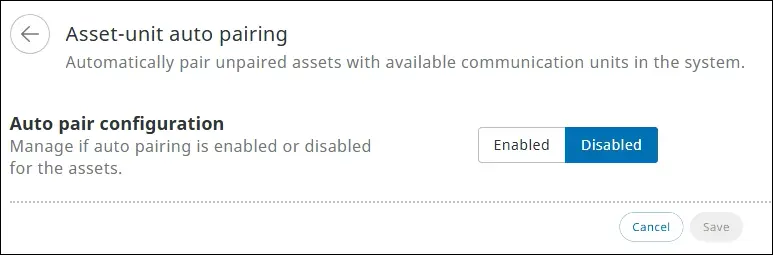
The asset and unit is paired automatically by using the Vehicle Identification Number (VIN) as the unique identifier.
- On the Assets page, click Settings in the upper-right corner. The Asset settings page is displayed.

- Click Asset-unit auto pairing. The Asset-unit auto pairing page is displayed.

- To enable auto-pairing, in the Auto pair configuration section, click Enabled.

- In the Asset types section, select the asset type to be enabled for pairing, and then click Save. The automatic pairing configuration is enabled.
- Currently, the auto-pairing feature is available for trailer asset type.
- To view unit types supported by asset for automatic pairing, click View supported unit types.
- The following unit types are supported by asset for auto-pairing: SCALAR EVO Guard, SCALAR EVO Pulse and TX-Trailerpulse.
By default, the automatic pairing is disabled.

Subscribe to event groups in Datahub subscription
To receive push message notifications, go to Datahub Portal and subscribe to ‘unit.paired’ and ‘unit.unpaired’ event groups. You will receive push notification messages to indicate whether the asset-unit pairing was successful or has failed. 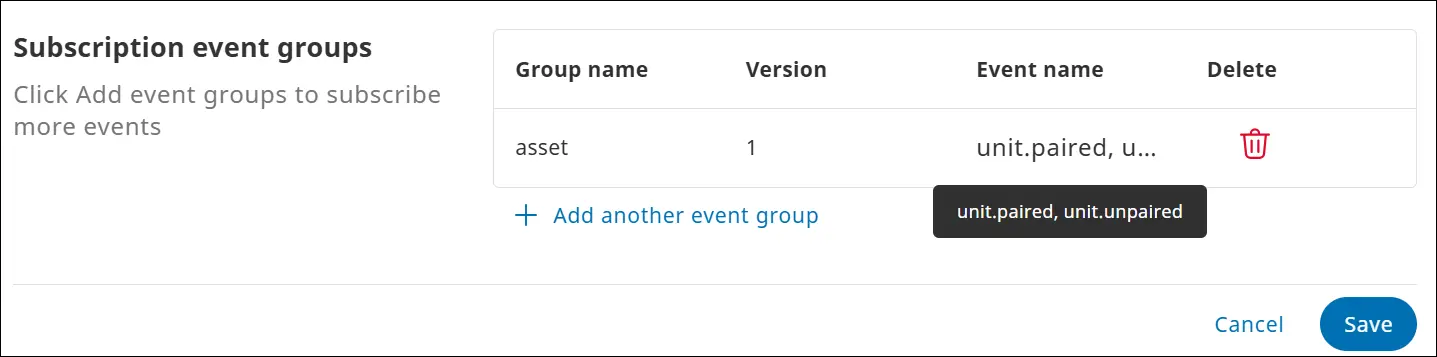
Notifications are pushed to the Webhook URL specified in the Datahub subscription module. For more information, see https://help.zf-scalar.com/docs/Datahub-Subscription.
- After you disable an automatic pairing, and if you have subscribed to ‘Unit.paired’ or ‘Unit.unpaired’ event groups, you will receive the push messages only in case of manual pairing.
After you re-enable the automatic pairing settings for the organization, you will again begin to receive push messages. - Administrator actions initiated for the asset and unit automatic pairing feature are tracked in the Audit logs.
Add model #
- On the Assets page, click Settings in the upper-right corner. The Asset settings page is displayed.
- Click the Model tab. The Models added section is displayed.

- Click Add model. The Add model dialog is displayed.

- In the Name box, enter a name for the model, from the Asset type list, select the asset type, and then click Save. The model is added.
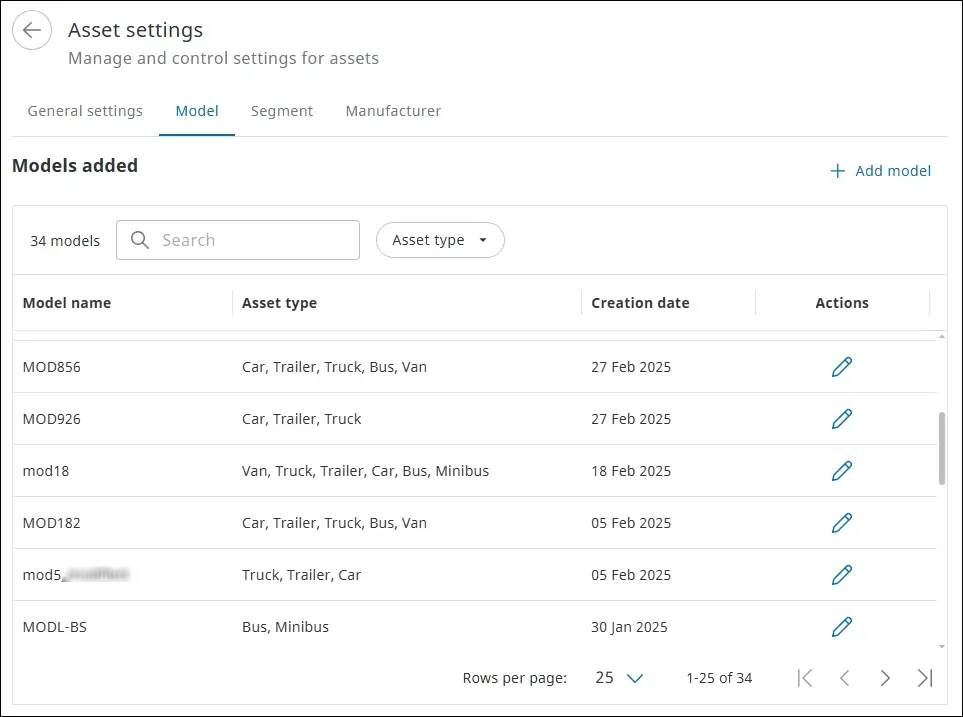
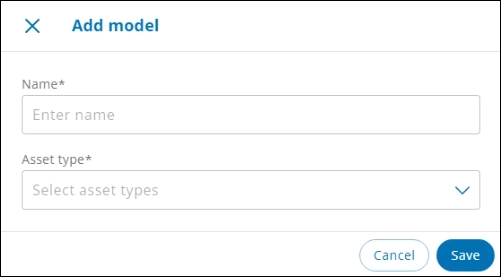
You can assign one or more asset types to the same model. However, after assignment, you cannot remove or unassign the asset type.
Edit model #
- On the Asset settings page, on the Model tab, click Edit
 icon next to the model to be modified. The Edit model dialog is displayed.
- Rename the model, select the asset type, and then click Save. The changed details are reflected in the Models added section.
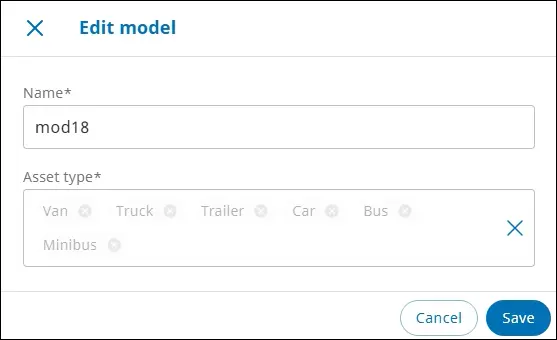
You can assign one or more asset types to the same model. However, after assignment, you cannot remove or unassign the asset type.
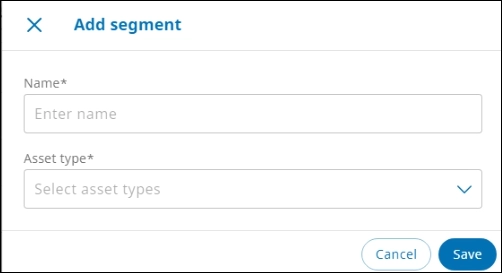
Add segment #
Trailers can broadly be classified into segments based on their inherent characteristics, such as enclosed trailers, refrigerated trailers, and flatbed trailers.
- On the Assets page, click Settings. The Asset settings page is displayed.
- Click the Segment tab. The Segments added section is displayed.

- Click Add segment. The Add segment dialog is displayed.

- In the Name box, enter a name for the segment, from the Asset type list, select the asset type, and then click Save. The segment is added.
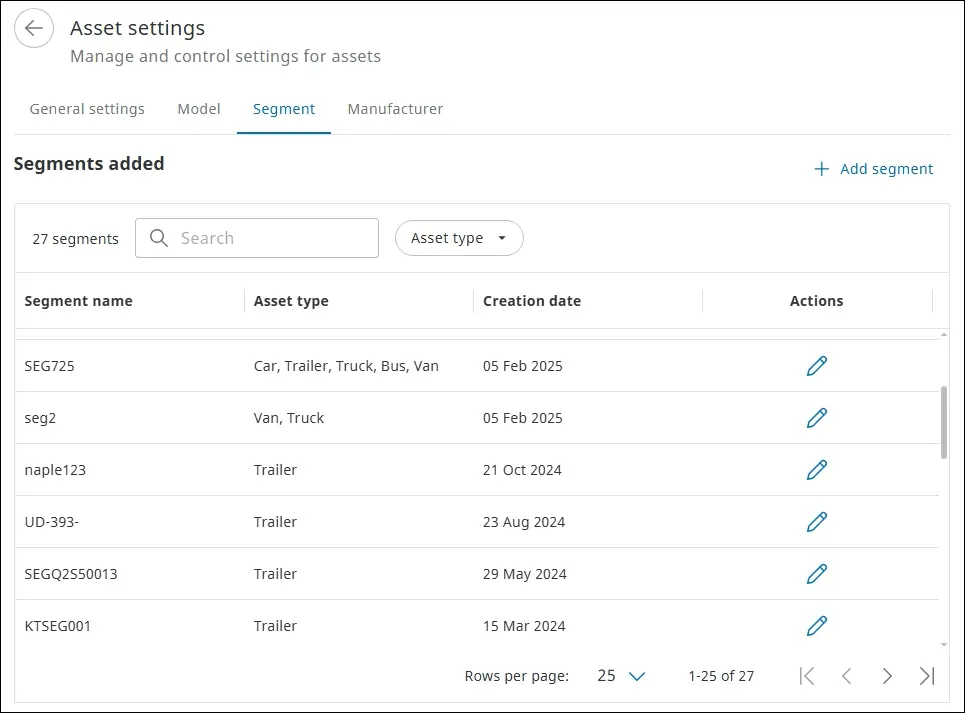
You can assign one or more asset types to the same segment. However, after assignment, you cannot remove or unassign the asset type.
Edit segment #
- On the Asset settings page, on the Segment tab, click Edit icon next to the segment to be modified. The Edit segment dialog is displayed.

- Rename the segment, select the asset type, and then click Save. The changed details are reflected in the Segments added section.

You can assign one or more asset types to the same segment. However, after assignment, you cannot remove or unassign the asset type.
Add manufacturer #
You can specify the vehicle manufacturer on the Manufacturer tab.
- On the Assets page, click Settings. The Asset settings page is displayed.
- On the Asset settings page, click the Manufacturer tab. The Manufacturers added section is displayed.

- Click Add manufacturer. The Add manufacturer dialog is displayed.
- In the Name box, enter the vehicle manufacturer name, from the Asset type list, select the asset type, and then click Save. The manufacturer is added.
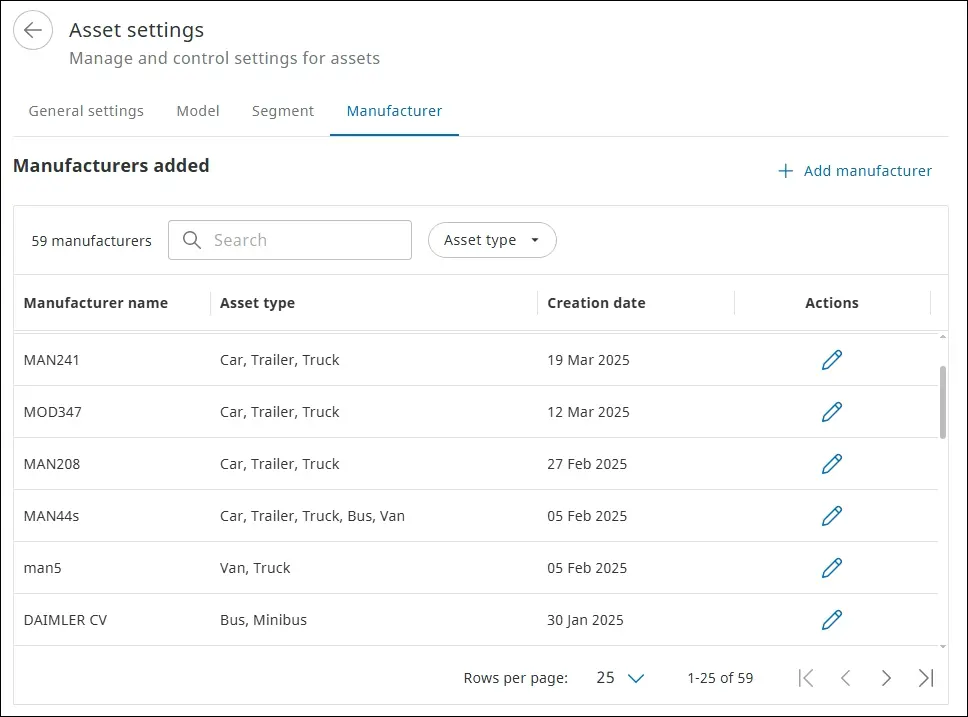
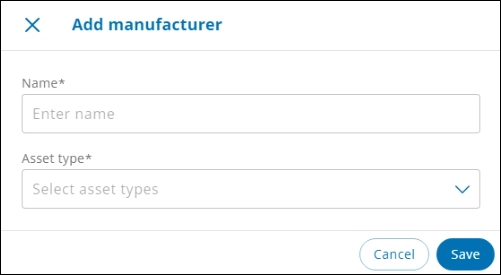
You can assign one or more asset types to the same manufacturer. However, after assignment, you cannot remove or unassign the asset type.
Edit manufacturer #
- On the Asset settings page, on the Manufacturer tab, click Edit icon next to the manufacturer to be modified. The Edit manufacturer dialog is displayed.

- Rename the manufacturer in the Name box, select the asset type, and then click Save. The changed details are reflected in the Manufacturer added section..
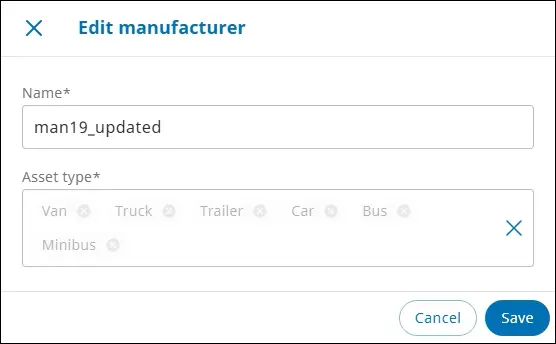
You can assign one or more asset types to the same manufacturer. However, after assignment, you cannot remove or unassign the asset type.
Filter Assets on the Assets page #
Filter assets to narrow search results based on the asset status and category on the Assets page using the Filters option.
- To open the filter pane, on the Assets page > click Filters. The Filter pane is displayed.
- In the Status section, select the required option.
- In the Category section, select the required checkboxes. The asset records that fulfill the criteria are listed.
Assets for which specific user actions are required are marked as Pending.
Filter Assets on the Asset settings page #
Filter assets to narrow search results based on the asset type by using the Filters option.
- On the Asset settings page, go to the required tab, and then click Asset type. The Filter by asset type list is displayed.

- Select the checkbox next to the required asset type. The asset type records that fulfil the criteria are listed.
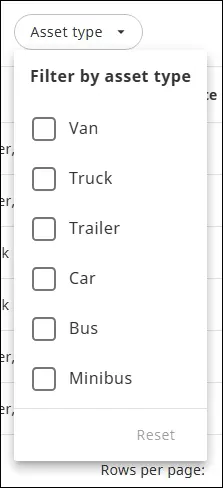
The Asset type filter is available within the Model tab, the Segment tab, and the Manufacturer tab.
Search an Asset #
You can search for an asset on the Assets page using the Search feature.
- In the Search box, enter the required information. Records matching the search criteria are listed.
- Enter fleet ID, license plate, unit type, unit serial number, or code number to initiate a search.
- Enter at least three characters to start a search operation.
Export Asset Details #
You can export registered asset records from the Assets page for analysis and reporting.
On the Assets page > click the Export link. The exported data is downloaded to the default download folder as a CSV file.