

Places are areas of interest created and followed by transport companies (dispatchers) in the Map view. In the Admin module, you can manage places, geofences, and alarms that are triggered when an asset enters or leaves a site.
A dispatcher can add a place from the Map view.
Place groups #
Related places can be organized into place groups, which can be followed by the assigned users and teams from the Map view.
An administrator can create and edit groups and subgroups, search for places, and assign and unassign users and place groups from a place.
Add a Place #
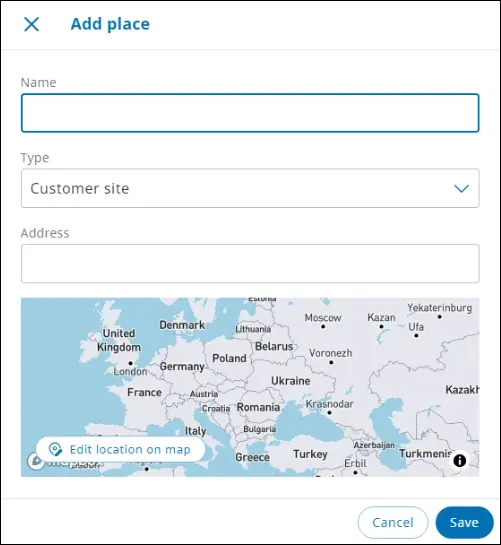
From the Places module, you can use the Add place function to add places of interest.
- In the Admin module, from the left navigation pane, click Places
 . The Places page is displayed.
 - Click Add place. The Add place dialog is displayed.

- Enter a name, select a site type from the Type list, enter the address in the Address box, and then click Save. The place details page is displayed.
NOTE:- The place created is reflected on the map as a pin (map marker). The pin is different based on the selected place type.
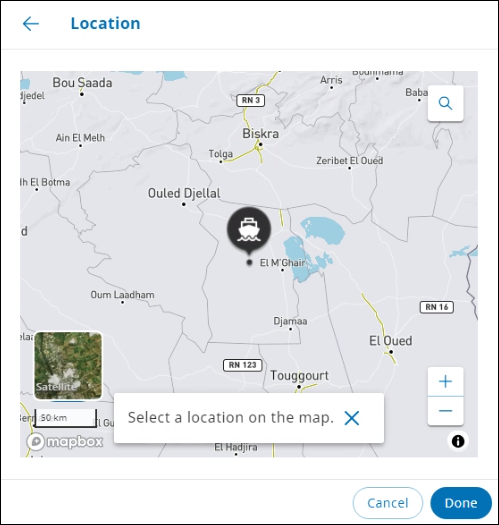
- To add a location directly from the map, click Edit location on map. The Location dialog is displayed. The cursor changes to Select
 : click to mark the required location on the map.
- To edit the address from the Location dialog, click Remove pin. Click Select on the required location on the map, and then click Done. The updated address is reflected on the map.
- To remove the selected location, click the Remove pin link.
On the map view, you can:
- Click Satellite
 to switch to the satellite view
 - Use the zoom buttons to zoom in and zoom out
 to switch to the satellite view
 to zoom in and zoom out
4. Click Save. The place details page is displayed.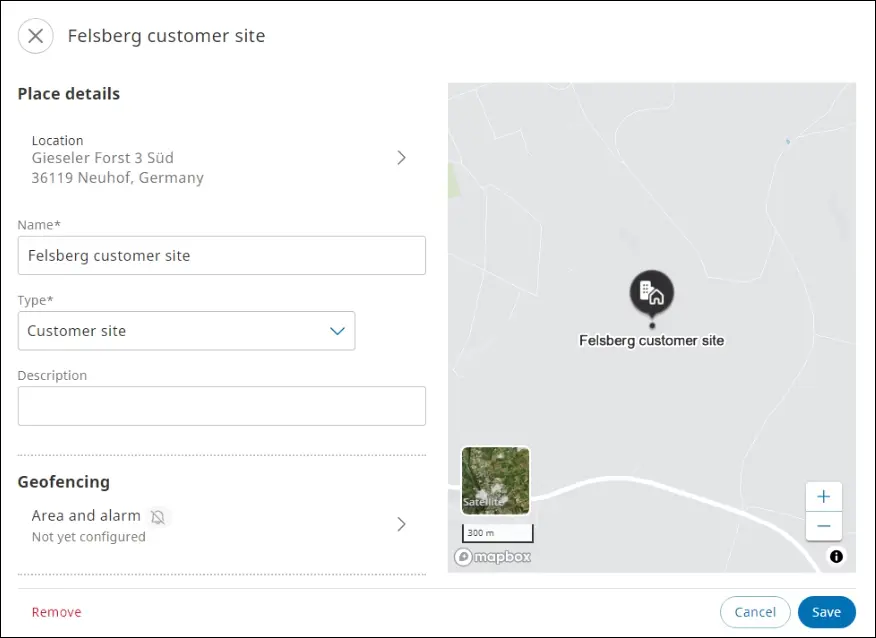
5. Enter details in the Place details, Geofencing, Contact, Notes, and Access sections as described in the table below.
| Section | Description |
| Place details | Information can be modified in the Location, Name, Type, and Description fields. |
| Geofencing | The area or surface radius can be modified using circular or polygon geofencing shapes. Alarms can be configured to set trigger parameters. NOTE: * Alarms can only be configured after the geofence is configured for a place. * Alarms can be configured for entering or leaving a place. * Details of the configured geofence is displayed in the Geofencing section. * An alarm configured is denoted by a green bell icon in the Geofencing section. |
| Contact | Enter the contact number, the email address, and the link to the website. NOTE: You can add up to 10 contact persons for a specific place. |
| Notes | An optional note can be added. |
| Access | You can assign users and place groups to access this place. For more information about organizing places into groups, see Place groups. Click Access. The Access page is displayed. * To restrict access to all places, click None. * To assign access to all users to this place, click Everyone. * To assign (selected) users and place groups to this place, click Selected. The Available users are listed on the Users tab. 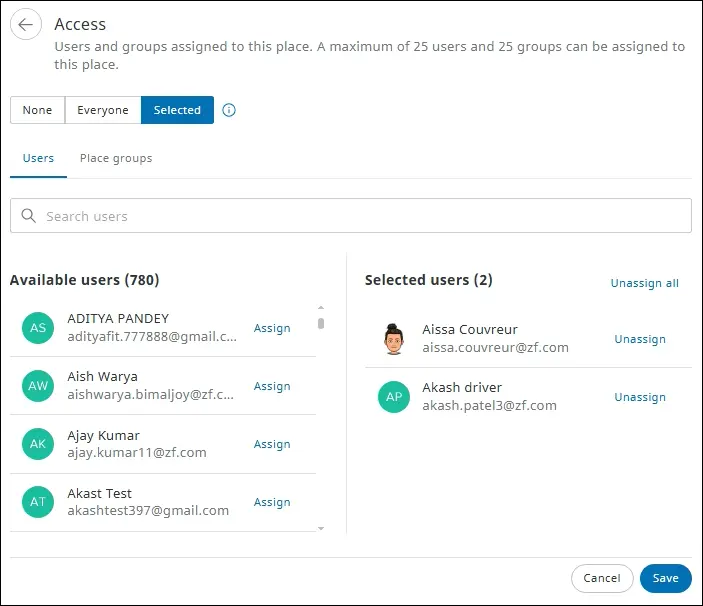 Assign users to the place 1. Click the Users tab. The users are listed in the Available users list. 2. To assign users to a place, select the required users from the Available users list. Alternatively, in the Search users box, enter the name of the required user, and then press Enter. 3. Click Assign next to the user name. The user is listed in the Selected users list. 4. Click Save. The user is assigned to the place. NOTE: In the Selected users section, click Unassign next to the user name. The user is unassigned. Click Save to permanently unassign the user from the place. Click Unassign all to unassign all the users from the place. Assign place groups to the place 1. Click the Place groups tab. The place groups are listed in the Available place groups list. 2. To assign a place group to a place, select the required place group from the Available place group list. Alternatively, in the Search for place groups box, enter the name of the required place group, and then press Enter. 3. Click Assign next to the place group name. The place group is listed in the Selected place groups list. 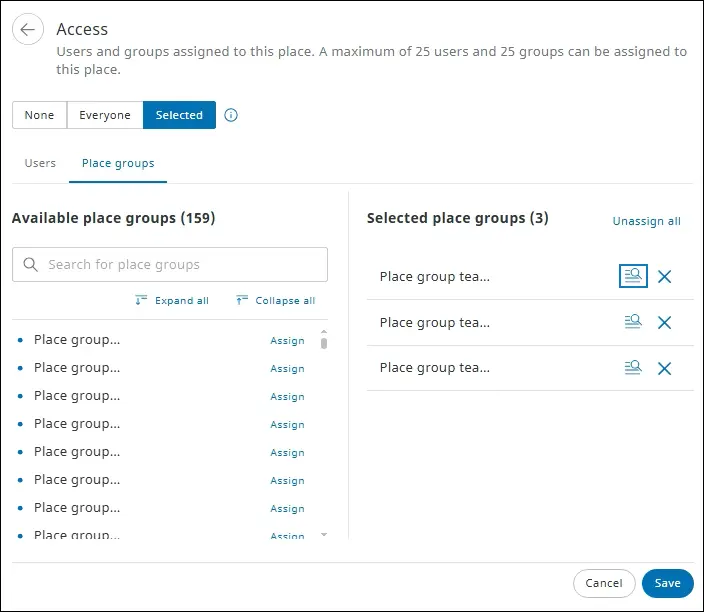 4. Click Save. The place group is assigned to the place. NOTE: In the Selected place groups section, click the Unassign  icon next to the place group name. The place group is unassigned. Click Save to permanently unassign the place group from the place. icon next to the place group name. The place group is unassigned. Click Save to permanently unassign the place group from the place.Click Unassign all to unassign all the place groups from the place. To trace the hierarchy from where the place group or a place subgroup is assigned, in the Selected place groups section, click the Locate  icon next to the place group name. The place group or subgroup is highlighted to denote its origin. icon next to the place group name. The place group or subgroup is highlighted to denote its origin.A maximum of 25 place groups can be assigned to a place. |
6. Click Save. The new place is added to the SCALAR platform. For more information, see how to enter details on the place details page in the Map article.
The place is assigned to the user who has created it.
Edit a Place #
You can modify the location, area, contact information and access details related to a site.
- From the Admin module > click Places , and then select the required place from the list. The place details page is displayed.
- Modify details in the Place details, Geofencing, Contact, Notes, and Access sections, and then click Save. The place is modified in the SCALAR platform. For more information, see how to add information in place details section in the Map article.
Manage Geofences #
A geofence is a virtual boundary created around a site. Multiple site types, such as customer site, danger area, and petrol station can be created.
For more information, see how to create, edit, or remove a geofence in the Map article.
View Places #
You can view the list of places from the Places page.
In the Admin module, from the left navigation pane, click Places ![]() . The Places page is displayed.
. The Places page is displayed.
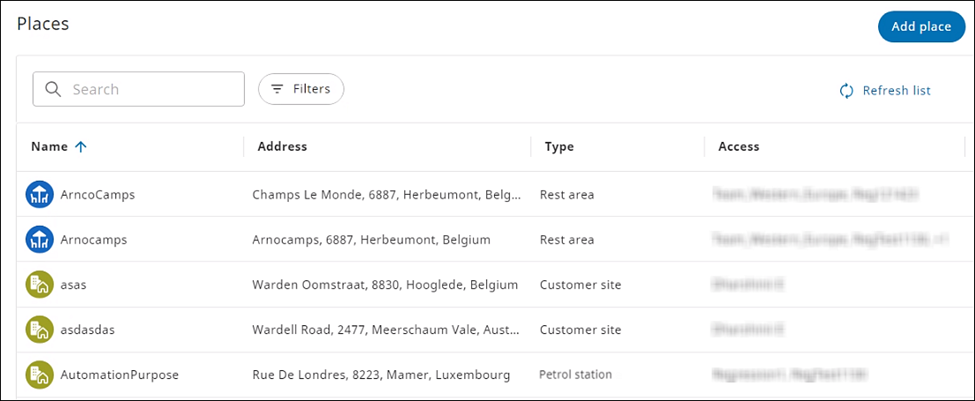
Available columns
Column |
Description |
Name |
Name of the place of interest NOTE:
You can sort the list of places by the Name column only. |
Address |
Postal address of the place |
Type |
Type of place such as industrial zone, rest area, petrol station, and ferry terminal |
Access |
Users or place groups that can access the place NOTE:
Users (dispatchers) who are assigned access to the place can view it on the Map view. |
Filter Places #
On the Places page, you can filter places to narrow search results based on place type and access by using the Filters option.
- In the Admin module, from the left navigation pane, click Places . The Places page is displayed.
- To open the filter pane, click Filters.
- Select the required option in the Place type and Access sections. The results matching the selection are displayed.
Filter Access Details Specific to Users and Groups #
- On the Places page > click Filters. The Filter pane is displayed.
- In the Access section, select the Users/Groups option. The Enter a name or e-mail list box is displayed.
- Enter the required user or group name. The place records that fulfil the criteria are listed.
- To close the Filter pane, click Close .
- To clear the selected filter criteria, click the Reset all link.
- The numeric value displayed on the Filters button indicates the number of filter criteria selected.
 .
.Search a Place #
- In the Admin module, from the left navigation pane, click Places . The Places page is displayed.
- To search a specific place, enter the name of the place in the Search box. The records matching the search criteria are listed.
Enter at least three characters to start a search operation.
Remove a Place #
You can remove a place from the SCALAR platform permanently if not required anymore.
- From the Admin module > click Places , and then select the required place from the list.
- Click Remove. A confirmation message is displayed.
- To confirm the action, click Remove. The place is removed permanently from the SCALAR platform.


