

Need help? Just reach out to the SCALAR Customer Support team using the Support app. You can post questions, submit a case to report technical issues, and view and track the progress of your case.
Reach out to your organization’s administrator to obtain permission to access the Support module.
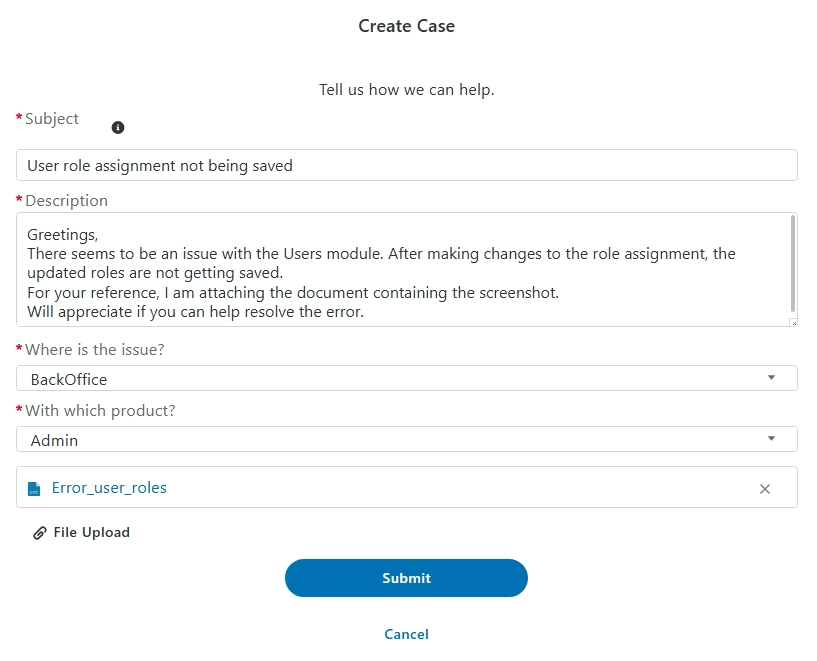
Create and submit a case #
You can report a case from the Cases page.
- In the Support module > click Cases
 . The Cases page is displayed.
 - Click Add New Case. The Create Case dialog is displayed.
- Enter information in the various fields as described in this table, and then click Submit.
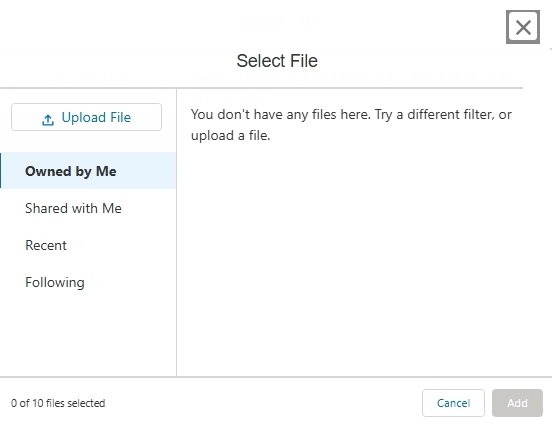
- To attach a file, in the Select File dialog, click the required tab, and then select the required file.
Alternatively, click Upload File to browse and select the file. - You can attach a maximum of 10 files for a case.
Field |
Action |
Subject |
Enter a brief description that explains the key aspects of the issue or query. |
Description |
Enter a detailed description of your issue (or query), which can help the Support team diagnose and troubleshoot the issue, reproduce the steps if applicable, and resolve it. |
Where is the issue? |
Select the domain or category for which you are reporting the case, such as Back Office, Integration, People mobility, or Trailer/Asset. |
With which product? |
Select the module in which the issue occurs. For example, if the category selected is ‘Back Office’, the available modules are listed, for example, Home, Admin, Fleet Installer, and Data Privacy. |
File Upload |
Click to upload a supporting document that can contain details of the error and steps taken to resolve the issue NOTE:
|
A confirmation message is displayed indicating that the case is created and a notification email is sent to the creator of the case. The Case summary section is displayed containing the case number that you can use to follow up on your case.

The Support team will reach out to you if they have queries. You can track the progress of your case on the Cases page.
View cases #
In the Support module, from the left navigation pane > click Cases ![]() . The Case window is displayed listing the cases logged by you.
. The Case window is displayed listing the cases logged by you.
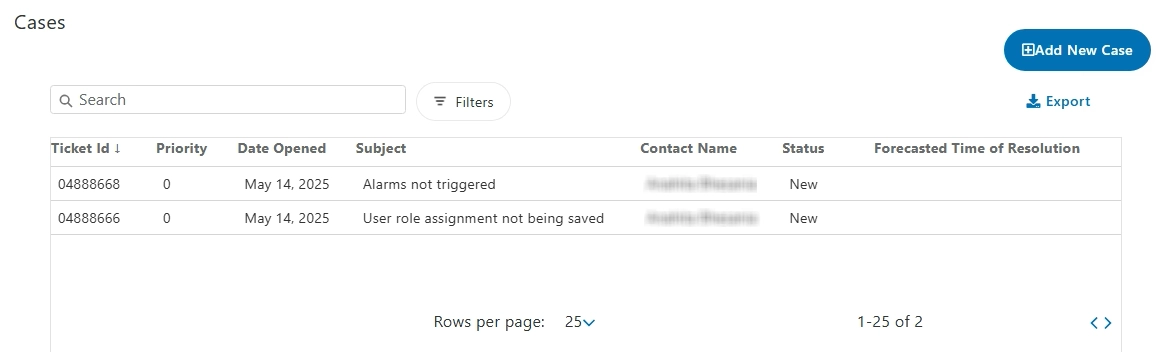
Available columns
Column |
Description |
Ticket Id |
Unique ID generated after a case is submitted, which can be used to track the progress. NOTE:
Click the arrow keys to sort the ticket IDs in ascending or descending order. |
Priority |
Current priority level. NOTE:
This is a read only field: the Support team will determine the priority. After you submit a case, the priority is 0 by default until it is assigned to the Customer Support Executive who will review the case details and set the priority level. |
Date Opened |
Date stamp of when the case was reported. |
Subject |
Subject line for the case that provides the context and summarization of the query or technical issue. |
Contact Name |
Logged-in user name who has reported the case. |
Status |
Resolution status NOTE:
The resolution status is set to ‘New’ if a case is unassigned and yet to be investigated. |
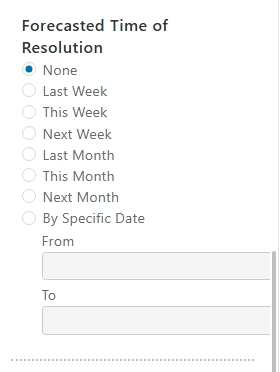
Forecasted Time of Resolution |
Estimated date when the case will be resolved. |
Export cases #
You can export your reported cases.
On the Cases page, click Export. The cases are exported to a .csv file.
Only filtered data is exported. To export all case records, from the Filters panel, reset all the applied filters.
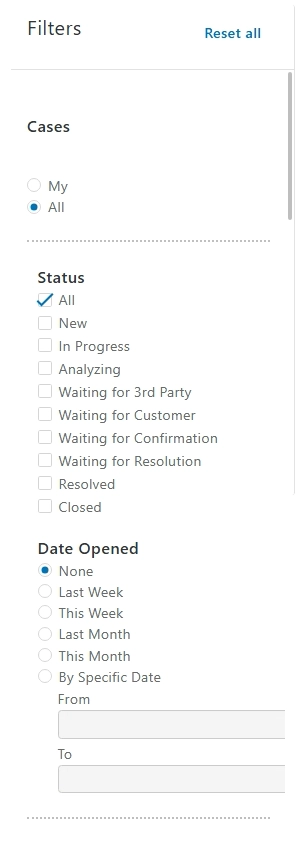
Filter cases #
Filter cases to narrow search results based on the case resolution status, time period during which it was reported, and the forecasted time of resolution on the Cases page using the Filters option.
- To open the filter pane, on the Cases page > click Filters. The Filters pane is displayed.
- Select the required options from the Cases, Status, Date Opened, and Forecasted Time of Resolution sections. The case records that fulfill the criteria are listed in the cases data grid.
This image is a continuation of the Filter pane.
Search a case #
You can search a case on the Cases page using the Search feature.
In the Search box, enter the required information. Records matching the search criteria are listed.
View, track, and edit case details #
After submitting a case, you can track its progress, chat with the Customer Support team by using the communication panel, and close the case.
On the Cases page, click the Ticket Id link. The case information section is displayed on the Details tab.
Chat with Customer Support #
While following up on a case, you can chat with Customer Support by entering comments in the Write a comment box in the communication panel. You can also view the message trail for reference.

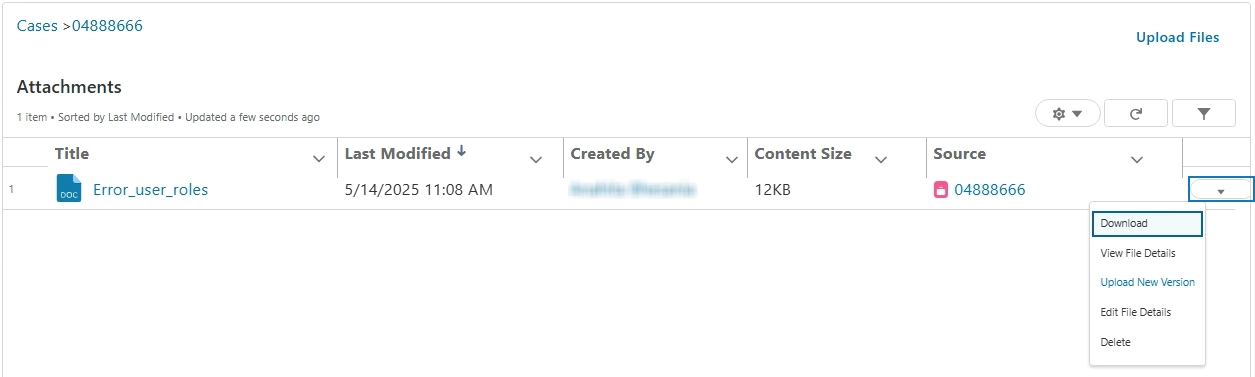
Attach multiple files #
You can upload multiple files from the Attachments tab subject to a maximum of 10.
- On the case information page, click the Attachments tab.
- Click View All. The Attachments page is displayed.
- Click Upload Files to browse and select a file. The file is uploaded and listed on the Attachments page.

Click the down arrow key to view the different file operations that you can perform, such as download, view file details, and upload new version.
Close a case #
After a case is resolved, you can mark it as closed.
On the case information page, click Mark Case as Closed. An acknowledgement message is displayed confirming that the case is closed. The updated status is reflected on the Cases page.
You cannot close a case if the case is being analysed by the Engineering team. However, you can post a comment and mention the reason as to why a case can be closed.
Determine availability of SCALAR support services #
You can verify the availablity status of the SCALAR services on the SCALAR Status page.
In the Support module > click SCALAR Status![]() .
.
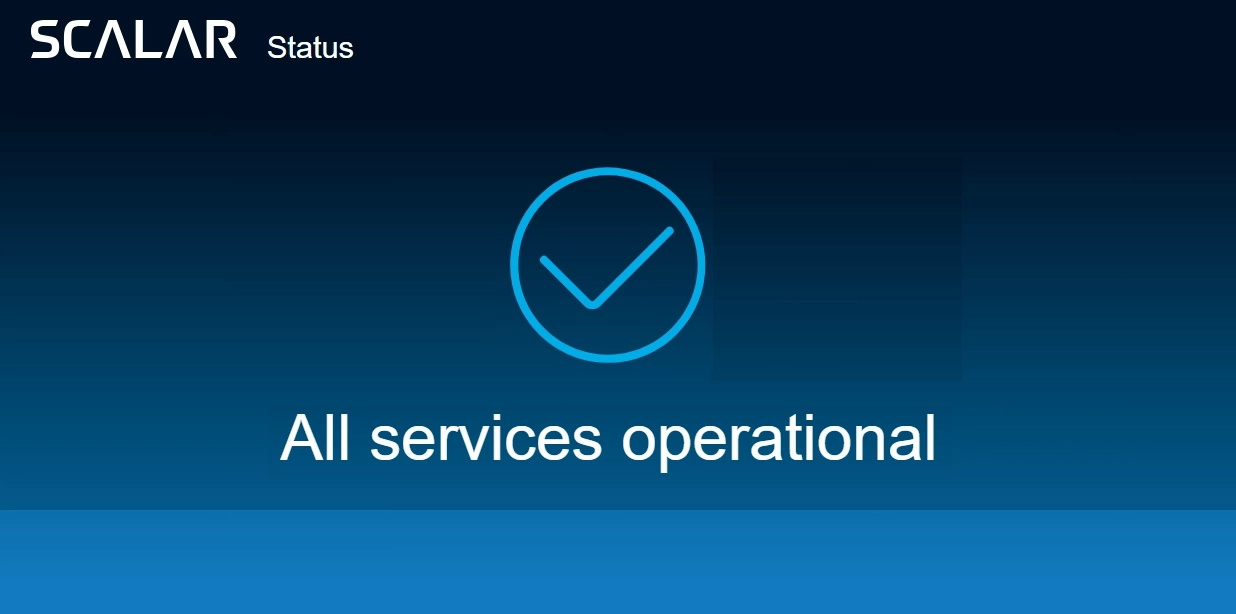
In the event of a service downtime, the status will be displayed along with an estimated time for restoration.


