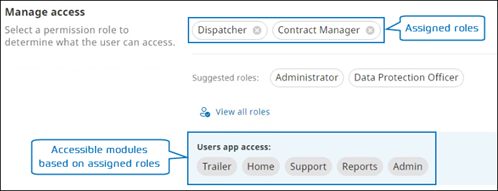
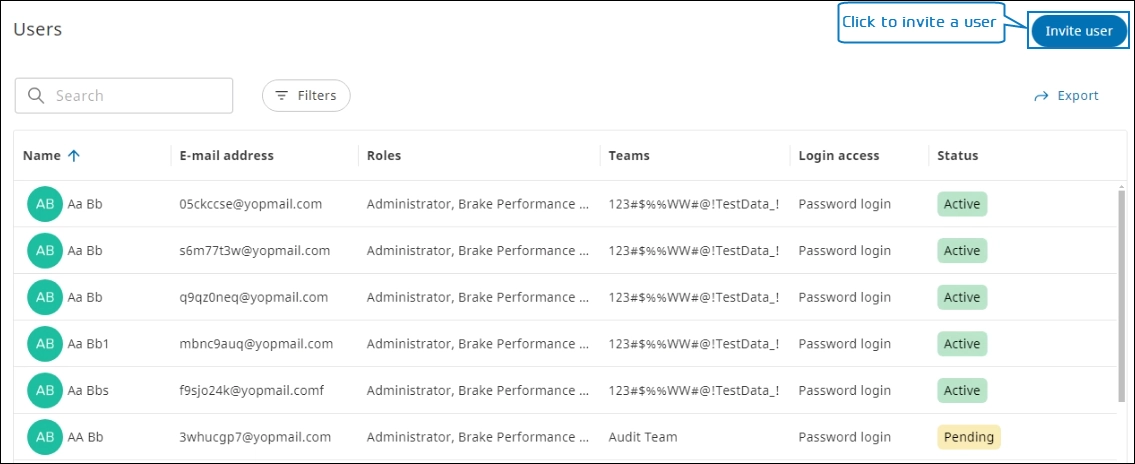
The Users module enables administrators to manage various user-related functions, such as adding new users, editing user details, and viewing user list.
Only authorized users can access the SCALAR application based on the assigned role.
Available Roles and Modules #
The available roles and modules accessible to SCALAR users are listed as follows.
| Role | Accessible tabs | Key functions |
| Administrator | Trailer, Home, Admin, Support, Datahub portal | Manage organizational resources, such as users, assets, and places |
| Brake Performance Manager | Home | Monitor break performance data of trailers and determine whether action is required |
| Certificate Service Manager Devops | PKI | Monitor the PKI (Public Key Infrastructure) of an organization to ensure secure communication over a network |
| Contract Manager | Admin | Manage organizational resources, such as users, assets, and places |
| Customizer | Service portal | Manage impersonation sessions generally aimed at addressing issues or troubleshooting |
| Data Protection Officer | Data Privacy | Manage data privacy requests |
| Development PKI Certificate Requester | PKI | Facilitate deployment and management of digital certificates within the development environments to ensure secure communication of systems and application over networks |
| Dispatcher | Trailer, Home, Support, Reports | Monitor organizational resources, such as assets |
| Eco Coach | Eco Coach, Reports | Track driving behavior and manage reports |
| OE Manager | Diagnostic Suite | Monitor diagnostics and use diagnostic tools to assess, analyse, resolve, and improve various aspects of operational processes within the organization |
| OEM Analyst | Trailer, Home | Monitor organizational assets, such as trailers |
| OE Technician | Diagnostic Suite | Monitor diagnostics and use diagnostic tools to assess, analyse, resolve, and improve various aspects of operational processes within the organization |
| Series PKI certificate requester | PKI | Facilitate secure issuance, installation, and management of digital certificates within a series of operations or events |
| Session Manager | Admin | Manage organizational resources such as users, assets, and places |
| Support User | Support | Manage support tickets |
| Workshop Manager | Admin | Manage organizational resources such as users, assets, and places |
| Workshop Technician | Diagnostic Suite | Monitor diagnostics and use diagnostic tools to assess, analyze, resolve, and improve various aspects of operational processes within the organization |
Invite User #
The account owner is added as a user and is configured as the first administrator on the ZF SCALAR platform. The account owner can thereafter add more users, resources such as assets, drivers, and other users and teams in the Admin module.
This functionality is subject to user permissions. Only an administrator can access the Admin module.
- In the Admin module > click Users
. The Users page is displayed.
- Click Invite user. The Invite user page is displayed.
- Enter information in the various sections as explained in the table below.
| Section and field | Action |
| User details | |
| First name Last name Email | Enter the first name, surname, and email address of the user. |
| Manage access | |
Next to Suggested roles, select the role to assign to the user.
NOTE:
The role determines the permission sets to access the different modules on the SCALAR platform. Click the View all roles link to view all the available roles. A description is provided for each role. | |
| Customize invitation | |
| Language | Select the language in which the Welcome email is to be composed.
NOTE:
A Welcome email that includes a registration link is sent to the user, which is valid only for 72 hours. |
| Assign to teams | |
| Teams | Assign the user to a new team: a. In the Teams list, enter the team’s name. A popup is displayed. b. Click the Add as a new team link. The Add team dialog is displayed. c. In the Name box, enter the name for the team, and in the Description box, enter the description or purpose for which the team is being created. The user is assigned to the new team and the team name is displayed in the Assigned teams section. Assign the user to an existing team a. In the Enter a team list, enter the team’s name. A popup is displayed.
NOTE:
Enter at least three characters to start a search operation b. Select the team from the list. The user is assigned to the specified team.
NOTE:
A user can be assigned to an existing team or a new team be assigned to multiple teams access all the resources such as assets, places, and drivers in a specific site that are assigned to the team. |
| Login access | Select the authentication method for signing in to SCALAR: * SSO login * Password login * SSO and Password login NOTE: For more information about the authentication method for signing in to SCALAR, see Configure Domain Settings in the Settings article. |
4. To generate a Welcome email, on the Invite user page, click Send invitation. A message is displayed confirming that the user has been invited. The user is added to the user list with the status Pending.
The new user must complete the registration process within time. To activate the user account, the user must click the Create account link included in the Welcome email. On the Sign In page, they must enter their username and set the password. The account is then activated and the status changes to Active.
Edit User #
You can edit user details such as profile photograph, name, and email address as well as access-related information related to roles and teams from the user information page.
- In the Admin module > click Users
. The Users page is displayed.
- To edit a user, go to the users list, and then click the required user. The user details page is displayed.
- Modify the required information in the User details, Invitation, and Access sections.
- Click Save. The updated information is saved.
Edit User Details #
You can modify user-specific details, such as upload or replace the profile photograph and modify the name and email address of the user. For more information, see Invite a User.
Upload or replace profile photograph #
- On the user information page > go to the User details section > click Photo. The Photo dialog is displayed.
- Click Upload photo to browse and select the image to be uploaded. The Crop & rotate dialog is displayed.
NOTE:The image file formats supported are .png and .jpg
- Use the slider to zoom in or zoom out, use the Rotate options to flip the image left or right as required, and then click Save. On the Users page, the profile photograph is reflected next to the username. You can also hold and drag the image to adjust its position.
Edit Access #
You can manage user access to resources by editing the role and team information.
Edit Role #
On the user information page > go to the Access section, and then click Roles. The Roles page is displayed. For more information on how to assign roles, see Manage Access.
Edit Active Teams #
On the user information page > go to the Access section, and then click Active teams. The Teams page is displayed. For more information on how to assign teams, see Manage Access.
To remove a user from a team, on the Teams page, in the Assigned teams section, click Close next to the team name. The user is unassigned from the team.
View User List #
In the Admin module > click Users . The Users page is displayed.
Next to the column name, click
in the column headers to sort the records in ascending or descending order.
Available fields
| Column name | Description |
| Name | Full name of the user |
| Email address registered with ZF | |
| Roles | Role assigned to the user, such as Administrator, Contract Manager, Dispatcher, and Data Protection Officer |
| Teams | Teams with which a user is assigned
NOTE:
A user can be assigned to multiple teams. |
| Status | Account status type: Active, Inactive, or Pending
NOTE:
If user creation is incomplete because of actions required of a user, the status is marked as Pending. |
Filter Users #
On the Users page, you can filter users to narrow search results based on the roles, teams, and account status by using the Filters option.
- In the Admin module > click Users
. The Users page is displayed.
- Click Filters to display the Filter pane.
- Select the required options in the Roles, Teams, and Status sections. The user records that fulfil the criteria are listed.
Filter users assigned to a specific team #
From the Teams section, select the Users from a specific team option. The Specify a team name list is displayed. Enter the team’s name with which the users are associated. The teams to which the user is assigned are listed.

Search a User #
In the Admin module > click Users . The Users page is displayed. In the Search box, enter the search criteria. The asset records matching the search criteria are displayed.
Enter at least three characters to start a search operation.
Export User Records #
User records can be exported as a CSV file for analysis and reporting from the Users page.
In the Admin module > click Users . The Users page is displayed. Click the Export link. The exported data is downloaded as a CSV file to the Downloads folder on your PC.
The image below shows a sample CSV file downloaded containing user details.

For more information about the column names, see View User List.
Remove a User #
- In the Admin module > click Users
. The Users page is displayed.
- Click the required user record. The user details page is displayed.
- Click Remove <user name>. A confirmation message is displayed.
- Click Remove account. The user account is permanently deleted from the ZF SCALAR platform.
